


Find the best meat processing equipment for home use, from grinders and stuffers to sealers and saws built for dependable, long-term work.
Learn how to clean meat processing equipment the right way to prevent buildup, protect flavor, extend machine life, and keep every batch safe.
Find meat processing equipment for sale built for home use, hunting camps, and small shops - grinders, stuffers, saws, sealers, and more.
Find the best deer processing equipment for clean, efficient field-to-freezer work from grinders and saws to sealers built to last.
Learn the key steps in meat processing, from chilling and cutting to grinding, seasoning, stuffing, and packaging for safe, quality results.
Learn the key steps in meat processing, from chilling and cutting to grinding, seasoning, stuffing, and packaging for safe, quality results.
10 Best Sausage Making Spices to Keep On Hand
A few good words about important seasonings for sausage. Find the best sausage making spices for fresh, smoked, and wild game sausage. Learn what each spice does and how to build better flavor.
Common Sausage Seasonings That Work
Learn which common sausage seasonings deliver the best flavor, how to balance spice blends, and what works for fresh, smoked, and cured sausage.
Best Spices to Make Sausage at Home
Learn which spices to make sausage taste right, from salt and pepper to sage, garlic, and paprika, with tips for fresh and smoked batches.
How to Use Sausage Stuffer Right
Learn how to use sausage stuffer equipment the right way, from prepping casings to filling links evenly with less mess, waste, and air.
Best Sausage Stuffer for Beginners
Find the best sausage stuffer for beginners with practical advice on size, style, and features that make home sausage making easier.
How to Season Cast Iron the Right Way
Learn how to season cast iron the right way for a tough, slick finish that holds up to real cooking, outdoor use, and years of dependable service.
Meat Grinder Parts Replacement Made Simple
Meat grinder parts replacement gets easier when you know what wears out, what fits, and when to repair or replace for safe, steady grinding.
Sausage Seasoning Guide for Better Batches
A practical sausage seasoning guide for fresh and smoked sausage, with spice ratios, mixing tips, and batch fixes for better flavor every time.
Choosing a Commercial Meat Mixer Grinder
Find the right commercial meat mixer grinder for butcher shops, delis, and processors with practical advice on power, capacity, cleanup, and value
Deer Processing Equipment Guide for Hunters
A practical deer processing equipment guide for hunters choosing grinders, saws, knives, sealers, and tools that hold up season after season.
What Size Meat Grinder Do You Need?
What size meat grinder should you buy? Learn plate sizes, motor strength, and batch capacity so you can choose the right grinder for the job.
Deer Processing Setup Example for Home Use
A practical deer processing setup example for home hunters, with the right tools, room layout, workflow, and gear choices for clean, efficient work.
Electric Meat Grinder Review for Real Work
Our electric meat grinder review covers power, size, durability, and real-world use, helping hunters, home cooks, and shops buy right.
Vacuum Packing Food Preservation Disadvantages
Learn vacuum packing food preservation disadvantages, from botulism risk to texture loss, shelf-life limits, and when sealing is not enough.
Does Vacuum Sealing Preserve Food?
Does vacuum sealing preserve food? Learn what it does well, where it falls short, and how to use it safely for meat, produce, leftovers, and more.
How to Use Chamber Sealer the Right Way
Learn how to use chamber sealer equipment for meat, soups, sauces, and bulk storage with practical steps, settings, and sealing tips.
Best Vacuum Sealer for Food Preservation
Find the best vacuum sealer for food preservation with practical advice on chamber vs edge sealers, bag types, durability, and real-world use.
How to Vacuum Seal Food for Storage Right
Learn vacuum sealing food for freezing the right way to prevent freezer burn, save meat quality, and store meals longer with better results.
How to Sharpen Butcher Saw the Right Way
Learn how to sharpen butcher saw blades safely and correctly, with practical steps, tools, and tips to keep cutting clean and save wear.
Electric Grinder vs Manual: Which Fits?
Electric grinder vs manual - compare speed, control, batch size, cost, and upkeep to choose the right meat grinder for home or shop use.
Sausage Casings Guide for Better Links
This sausage casings guide explains natural, collagen, and fibrous options so you can choose the right casing for fresh, smoked, or snack sticks.
Comparing chamber sealer vs suction sealer for hunters, homesteaders, and food businesses. See which machine fits your budget and workload best.
BLOGS
Best Meat Processing Equipment for Home
A deer on the ground or a freezer full of trim can turn into a long, frustrating day fast if your tools are light-duty, underpowered, or built for occasional kitchen use. The best Meat Processing Equipment for home use is not about buying the biggest machine on the market. It is about choosing dependable equipment that fits the way your family hunts, cooks, preserves, and puts food by.
For some folks, that means a grinder and a good sealer for burger and steaks. For others, it means a full setup with a butcher saw, sausage stuffer, mixer, slicer,and supplies to handle processing season after season. The right tools save time, reduce waste, and make the work cleaner, safer, and a whole lot more satisfying.
What the best Meat Processing Equipment for home really includes
A solid home setup usually starts with four basics: cutting tools, grinding equipment, stuffing equipment, and packaging tools. Everything else depends on what kind of processing you do most.
If you mainly break down deer, hogs, or cattle for your household, you need equipment that can handle volume without bogging down. If your goal is sausage, snack sticks, jerky, or cured products, then consistency matters just as much as power. A machine that smears fat, heats the meat, or struggles through a batch can hurt the final product.
That is why the best meat processing equipment for home kitchens and farm shops tends to look more like small-scale butcher equipment than ordinary countertop appliances. It needs to be sturdy, easy to clean, and ready to work more than once or twice a year.
Start with a unit you will not outgrow
If you only buy one major piece of equipment, make it a good grinder. Grinding is at the center of home processing, whether you are making burger, chili meat, sausage, or pet food. A weak grinder is one of the fastest ways to turn good meat into a chore.
For occasional small batches, a manual grinder can still earn its keep. It is simple, dependable, and useful where electricity is limited. But most home users who process game or livestock in any regular quantity are better served by an electric grinder. It cuts labor, keeps the batch moving, and gives more consistent results.
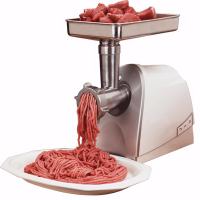
Grinder size matters. A small grinder may be enough for a few pounds at a time, but if you are doing several deer or large family batches, stepping up in capacity makes a real difference. Larger throat sizes, stronger motors, and better feed rates mean less trimming into tiny pieces and less time standing over the machine. A good model for many families is the Weston Pro Model #12. It has good power and includes important accessories that you will need. Here's a graphic showing it.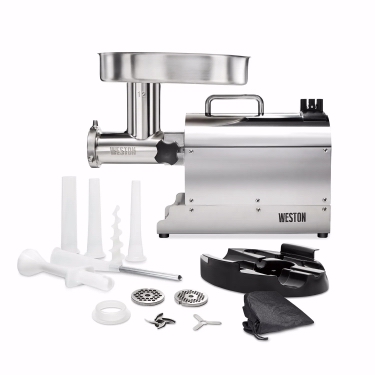
Just as important, pay attention to plates, knives, and replacement parts. A grinder is only as useful as the condition of its cutting surfaces. If you cannot get the right plate sizes or replacement knives when you need them, the machine becomes harder to keep in service. Good equipment should be built to last and supported with the parts that keep it working.
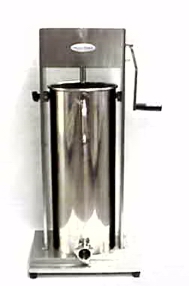
A sausage stuffer does a better job than a grinder attachment
Many folks start by stuffing sausage through their grinder. It can work, but it is far from the best way to do it. A dedicated sausage stuffer gives you better texture, less smear, and better control over casing fill.
For anyone making sausage more than once in a while, this is one of the smartest upgrades in a home setup. Vertical stuffers are popular because they save space and handle batches efficiently. [Manual models] are dependable and straightforward. Larger or powered units make more sense when you are producing heavier volumes or working with several recipes in one session.
The trade-off comes down to how often you use it. If sausage is an occasional project, a smaller manual stuffer may be plenty. If your family puts up links, summer sausage, and snack sticks every season, a heavier stuffer pays for itself in less frustration and a better finished product.

A vacuum sealer is not optional for serious home processing
Once the meat is cut, ground, or stuffed, packaging becomes the next job that matters. A poor seal can waste hours of work and good meat. Freezer burn, air leaks, and short storage life usually come back to weak packaging equipment.
For many households, a standard vacuum sealer handles everyday needs. It works well for steaks, chops, burger, and smaller freezer batches. But if you process in volume, seal liquids or marinades, or package sausage regularly, a vacuum chamber sealer is often the better long-term choice. Chamber units give stronger, more consistent seals and handle a wider range of products.
This is one of those places where buying a little more machine makes sense. Packaging is the last step before storage, and mistakes here show up months later when you open the freezer.
Cutting equipment should match the animal and the workload
A sharp boning knife and a dependable butcher knife belong in every meat room. They are the everyday tools that do most of the fine work. Comfort matters here. If a knife does not hold an edge or fit your hand well, you will feel it by the end of the day.
For bigger breakdown jobs, a butcher saw can make quartering and bone-in cuts much easier. That is especially true for hunters and farm families handling whole animals or larger sections. If you mostly process boneless trim and boxed meat, you may not need one. But for home butchering, a good saw earns its place quickly.
A meat slicer is another tool that depends on what you make. It is not essential for every home processor, but it is a strong addition if you prepare jerky, bacon, deli meat, cheese, or uniform cuts for curing. The best setups are not always the biggest. They are the ones built around the work you actually do.
Do not overlook mixing, seasoning, and prep tools
Don't take sausage mixes for granted. They can make the difference between poor or mediocre sausage and really great sausage. One I really like is the Venison Sausage mix. Once you taste that one, you won't forget it. Of course, we have 30 other mixes as well. Among them are several tried and true ethnic recipes. They are well worth trying!
A lot of home processors focus on the grinder and forget the steps before and after it. Meat tubs, lugs, mixing tools, tenderizers, thermometers, and scales all help produce better results. These are working tools, not extras.
If you make sausage, uniform mixing is critical. Uneven seasoning or poor bind can ruin a batch no matter how good your grinder is. A meat mixer saves time and improves consistency, especially on larger runs. The same goes for accurate measuring tools when working with cure, spices, or snack stick blends.
Good prep tools also help with sanitation and speed. The easier your setup is to organize and clean, the more likely it is to get used properly.
How to choose the best home Meat Processing Equipment for your needs
There is no single perfect package for everyone. A hunter processing two deer a year does not need the same setup as a homestead family raising hogs, and neither one has the same needs as a small-town market making sausage for sale.
Start by asking how much meat you process in a year, what products you make most, and where your current system slows you down. If grinding takes too long, upgrade the grinder first. If sausage quality is the issue, move to a real stuffer. If freezer storage is failing, invest in better sealing equipment.
Space matters too. Some families have a dedicated processing room or shop. Others work out of a garage, utility room, or country kitchen. That affects whether compact manual equipment makes more sense than larger floor or bench models.
Budget matters, but so does replacement cycle. A cheaper machine that struggles every season and needs replacing is often more expensive in the long run than durable equipment built for repeated use. That old country rule still applies here - buy the right tools for the job, and they will serve you well.
What separates good equipment from disposable equipment
The difference usually shows up in the details. Heavier construction, stable bases, cleaner welds, stronger motors, better crank systems, and easy-to-find replacement parts all matter. So does whether the equipment is simple to take apart, wash, and put back into service.
Good meat processing equipment should feel like working gear, not a gadget. It should stand up to cold meat, long batches, and repeated cleaning without becoming loose, noisy, or unreliable. That is especially important for folks who process during hunting season, butcher livestock at home, or make sausage as part of the family routine.
At Heinsohn's Country Store, that practical standard still means something. Folks who work with meat at home are not looking for novelty. They want equipment that does the job right and keeps doing it.
If you are building your setup from scratch, begin with the jobs you do most and add from there. A dependable grinder, a proper stuffer, sharp cutting tools, and a strong sealer will carry most home processors a long way. Once those basics are in place, every batch gets easier, cleaner, and more worth the work.
How to Clean Meat Processing Equipment
A meat grinder that looks clean can still hide fat, protein film, and bacteria in the places that matter most. If you process venison after a hunt, grind burger for the family freezer, or run a small shop that depends on steady output, knowing how to clean meat processing equipment is part of doing the job right. Clean gear protects flavor, helps equipment last longer, and keeps one batch from causing trouble for the next.
Why proper cleaning matters
Meat Processing Equipment works hard, and it gets dirty in ways a quick rinse will not fix. Fat clings to plates, knives, augers, seals, and housings. Protein residue dries fast and turns stubborn. Seasonings, cure, blood, and tissue can collect in corners you do not see until the machine starts smelling off or performance drops.
That buildup is not only a sanitation problem. It also affects how your equipment runs. A grinder plate with trapped residue can slow product flow. A slicer with food film can drag instead of cutting clean. A stuffer with neglected seals can wear out faster. Good cleaning is basic maintenance, and in a home setup or a small commercial operation, maintenance is money saved.
How to clean meat processing equipment without missing the problem spots
The best cleaning routine starts before the first part goes into the sink. Unplug the machine, shut off power, and make sure everything is safe to handle. If the equipment has been running, let hot components cool enough to work with comfortably, but do not let meat residue sit any longer than needed. Fresh residue comes off easier than dried-on buildup.
Disassemble the unit as far as the manufacturer allows. That usually means removing trays, guards, plates, knives, augers, stuffing tubes, lids, gaskets, and removable bins. If you skip full disassembly, you are usually cleaning around the mess instead of removing it. For grinders, the knife and plate deserve extra attention. For slicers, the blade guard, carriage, and product tray are common problem areas. For mixers and stuffers, seals, paddles, cylinders, and release valves often hold hidden residue.
Before washing, scrape or wipe off heavy material. A plastic scraper, brush, or disposable towel helps remove fat and meat bits without pushing debris farther into seams. This step keeps wash water cleaner and makes the next stage more effective.
Use the right water temperature and cleaning method
A lot of folks assume hotter water is always better. It depends on the stage of cleaning. Very hot water can melt fat, but it can also spread grease around and start setting protein residue onto surfaces if you are not using detergent right away. Warm water with a proper food-safe cleaner is usually the better starting point.
Wash each removable part with hot, soapy water or with an approved food equipment cleaner mixed according to directions. Use brushes sized for the job. Small detail brushes help with threaded collars, stuffing tubes, and narrow channels. Larger bristle brushes work better on trays, housings, and flat surfaces. Avoid steel wool or anything too aggressive on stainless surfaces, because scratches give residue a place to hang on.
If parts are dishwasher safe, that can help in some home operations, but it is not a blanket answer. Sharp grinder knives, plates, and some aluminum parts may do better with hand washing. Some finishes can discolor or wear if cleaned the wrong way. This is one of those cases where speed and proper care do not always point the same direction.
Pay close attention to grinder parts
Grinders take the hardest abuse and often cause the most cleaning trouble. The feed tube, head, auger, knife, plate, retaining ring, and tray all need a full wash after use. Meat paste likes to pack behind the plate and around the auger shaft, and if you leave even a little behind, the smell will tell on you later.
After washing, inspect the plate holes and knife edges. If the plate still looks dark or clogged, brush it again from both sides. If the knife has nicks or has gone dull, cleaning alone will not fix poor performance. A dull knife smears meat instead of cutting it clean, and that can create more residue and heat during the next run.
Dry grinder parts fully and lightly protect carbon steel components if the manufacturer recommends it. Some parts can rust in a hurry, especially if they are put away damp. Stainless still needs to be dried well, but carbon steel requires more care.
Slicers, saws, stuffers, and sealers need different attention
Slicers call for patience. The blade edge, blade guard, carriage track, thickness control area, and sharpener housing can all collect food residue. Clean with the blade locked and handled carefully. A rushed slicer cleanup is where cuts happen.
Band saws and butcher saws need a full wipe-down and careful wash around blade guides, wheels, tables, and guards. Bone dust and meat particles get into places that are easy to overlook. If your work includes both boneless trim and bone-in cuts, saw cleanup can be more demanding than grinder cleanup.
Sausage stuffers should be emptied completely, then broken down and washed cylinder by cylinder, tube by tube, and seal by seal. If a gasket smells sour or feels sticky after cleaning, it may need replacement. Vacuum chamber sealers require another approach. The chamber, lid gasket, seal bar area, and drain zones need routine cleaning, but electrical components and certain internal sections should never be soaked. Wipe, wash approved removable parts, sanitize, and keep moisture away from places it does not belong.
Sanitize after cleaning, not instead of cleaning
Sanitizer is not a shortcut for poor washing. First remove grease, protein, and visible residue. Then apply a food-safe sanitizer according to label directions and required contact time. If you spray sanitizer over a dirty surface, you have not solved much.
Let sanitized parts air dry when possible, or use clean towels reserved for food equipment only. Dirty shop rags can undo all the work you just finished. Once dry, reassemble carefully and check that blades, plates, gaskets, and moving parts are seated correctly.
Drying and storage matter more than most people think
A lot of equipment problems start after cleaning, not during use. Parts stacked damp in a drawer can rust, mildew, or pick up dust and shop debris. Store clean parts in a dry area, preferably covered or contained. Keep grinder knives and plates together as matched sets if they were fitted that way, and do not toss sharp parts loose into a bin where edges can knock against each other.
If you process meat only seasonally, inspect everything before it goes back into service. Dust, corrosion, dried lubricant, and pests can create trouble after months in storage. A clean machine put away wrong is still a problem waiting to happen.
Common mistakes when cleaning meat processing equipment
The biggest mistake is waiting too long. Once fat hardens and protein dries, every step takes longer. The second is partial disassembly. If you never remove the plate, guard, gasket, or valve, you never really cleaned the equipment.
Another common problem is using the wrong cleaner on the wrong material. Aluminum can react badly to harsh chemicals. Some seals and plastics do not like strong solutions or high heat. There is also the temptation to hose down electric equipment. That may feel efficient, but it can ruin switches, motors, and bearings in a hurry.
Build a routine that fits your operation
A home processor handling a deer once in a while does not need the same cleaning schedule as a butcher shop running every day. Still, the standard is the same - clean after every use, sanitize food-contact surfaces, dry thoroughly, and inspect wear parts often. In heavier-use operations, a mid-shift cleanup may be necessary, especially when switching between products or allergens.
It helps to keep the right tools close by: food-safe cleaner, sanitizer, detail brushes, towels, scrapers, gloves, and replacement parts that wear out first. Families, hunters, and small businesses all save time when cleaning supplies are treated as part of the setup instead of an afterthought. That old country rule still applies here: use the right tools for the job, and the job goes better.
When you take cleaning seriously, your equipment works cleaner, your product tastes better, and your investment lasts longer. That is good sense whether you are feeding your household, filling orders for customers, or putting up meat for the winter.
Meat Processing Equipment for Sale Guide
When a grinder bogs down halfway through deer season or a bargain stuffer starts leaking around the piston, you learn fast that not all gear is built for real work. Good Meat Processing Equipment for sale should do more than look decent in a catalog. It should hold up under steady use, clean up without a fight, and help you put good meat on the table with less waste and less frustration.
For most folks, the right setup depends on how often they process, how much volume they handle, and whether they are feeding a household or running a small business. A family grinding burger a few times a year needs something different than a deer camp handling several animals in a weekend. A small butcher shop or local restaurant has another set of demands altogether. The smart buy is not always the biggest machine. It is the one that fits the job, the workload, and the way you work.
Choosing Meat Processing Equipment for sale by workload
Start with volume. That is the plain truth behind most equipment decisions. If you process five to ten pounds at a time, a smaller manual or electric unit may serve you just fine. If you regularly work through fifty pounds or more, undersized equipment becomes a bottleneck in a hurry.
electric meat grinders are often the backbone of a processing setup because they save time and produce a more consistent grind. For home users, they make sense when you process game, trim your own beef or pork, or make sausage often enough that hand-cranking gets old. Manual grinders still have their place, especially for lighter use, backup duty, or folks who value simple tools with fewer parts to maintain.
That said, bigger is not always better. A large commercial grinder takes more room, weighs more, and costs more. If you only bring it out twice a year, you may be paying for capacity you do not need. On the other hand, going too small often leads to overheating, slower output, and more wear on the motor. Matching horsepower, throat size, and grinding plate options to your real workload matters more than chasing the biggest model on the shelf.
The core machines that do the heavy lifting
A solid grinder usually comes first, but it rarely works alone. Most complete setups grow around a few dependable categories.
Grinders and grinder accessories
Grinders handle the basic work of breaking down meat for burger, chili meat, sausage, and seasoned blends. Beyond the machine itself, the accessories matter just as much. Plates, knives, stomper tools, pans, and replacement parts keep a grinder working like it should. If parts are hard to find, even a good machine can turn into a headache later.
Experienced users know that plate size affects texture and final use. A coarse grind works for chili or first-pass sausage prep, while a finer plate gives you a smoother finished product. Having options lets one machine do more than one job.
Sausage stuffers
If you make sausage with any regularity, a dedicated stuffer is worth it. Yes, some grinders can push meat into casings, but stuffing through a grinder can smear the meat, warm the mix too much, and slow the whole process. A proper sausage stuffer gives you better control, better texture, and less aggravation.
This is one area where capacity matters. Small vertical or horizontal stuffers work well for family batches. Larger units save time when you are running links for customers, events, or bulk freezer prep. Stainless construction, smooth gears, and easy-to-clean canisters are worth paying attention to because sausage work is messy enough without poor design making it worse.
Butcher saws and cutting tools
Breaking down larger cuts calls for the right saws and knives. For hunters and small processors, a dependable butcher saw helps with quarters, ribs, and bone-in cuts. A sharp knife does plenty, but there are jobs where a saw is simply the right tool.
The trade-off here is straightforward. Hand tools cost less and take less space, but they require more labor and a steady hand. Powered cutting equipment increases speed and consistency, though it also brings a higher price and more maintenance. For many home users, a well-chosen mix of hand tools and one or two powered pieces is the practical middle ground.
Vacuum chamber sealers and packaging tools
Processing does not end when the meat is ground or stuffed. If it is headed to the freezer, proper packaging protects the quality of your work. Vacuum sealers help cut down on freezer burn, preserve freshness, and keep portions organized.
Chamber sealers stand out when you process in volume or package wet products, marinated cuts, or sausage in regular batches. They are a bigger investment than basic external sealers, but they deliver a stronger, more consistent seal. For households putting up game meat each season, that can mean less waste and better eating months down the road.
What separates dependable equipment from throwaway equipment
A low price can look good until the gears strip, the motor struggles, or replacement parts are nowhere to be found. Folks who process meat regularly tend to judge equipment by a few plain standards: build quality, serviceability, and how it performs under repeated use.
Stainless steel parts are popular for good reason. They clean easier, resist corrosion better, and hold up well in food processing environments. Metal gears generally beat plastic for heavier applications. Stable bases, secure clamps, and straightforward controls also matter more than flashy design.
Cleanability is another point people sometimes overlook at first. Meat work is not forgiving when it comes to sanitation. Equipment should come apart without a wrestling match and go back together without guesswork. Tight corners, awkward housings, and fussy components can turn cleanup into the worst part of the day.
A warranty also says something about the seller and the product. A one-year guarantee is not just a line in the fine print. It shows that the business expects the equipment to perform and is willing to stand behind it.
Home processors and small businesses need different answers
There is some overlap, but home use and business use are not the same. A homesteader processing hogs each year may want sturdy, versatile equipment that stores well between uses. A small deli or butcher shop usually needs more continuous-duty performance, faster output, and more durable components.
For home users, flexibility often matters most. One grinder, one stuffer, a dependable sealer, and the right spices and supplies can cover a lot of ground. For small commercial operations, uptime matters just as much as versatility. If a machine is central to daily production, it needs to be built for that kind of load.
That is why shopping by category alone is not enough. You have to think through your process from trim to grind to stuffing to packaging. Weak spots usually show up where one piece of equipment cannot keep pace with the rest.
Replacement parts matter more than most folks think
A lot of people shop for the machine and forget about the parts. That is a mistake. Knives dull, plates wear, gaskets need replacing, and stuffing tubes go missing. If you use your equipment year after year, parts availability is part of the value.
This matters even more for older or hard-to-find units. A broad catalog that includes replacement parts, specialty tools, and accessories saves time and keeps good equipment in service longer. That old-fashioned practicality is worth something. A machine you can maintain is usually a better investment than one you have to replace outright.
Meat Processing Equipment for sale that fits real life
The best meat processing equipment for sale is not chosen by guesswork or by whatever is cheapest this week. It is chosen by how you live and work. Hunters need gear that can handle seasonal surges. Farm and ranch households need equipment that earns its keep over time. Small food businesses need dependable output and straightforward maintenance. All of them need tools that are built for use, not just display.
That is why a broad, practical selection matters. A store like Heinsohn's Country Store serves folks who want the right tools for the job, whether that means a hand grinder for occasional use, a commercial stuffer for steady sausage making, a butcher saw for breaking down larger cuts, or a chamber sealer for clean, dependable packaging. Good equipment supports self-reliance, saves product, and helps families and businesses make the most of every pound.
If you are buying with the long haul in mind, look past the sales talk and ask a simple question: will this equipment still be doing honest work after the season, after the next batch, and after the next year? That answer will usually steer you right.
Best Deer Processing Equipment That Lasts
A deer on the ground is the easy part. Getting that animal from the field to the freezer without wasting meat, fighting poor tools, or wearing yourself out is where the real work starts. The best deer processing equipment is not about buying every gadget on the market. It is about putting dependable tools in the right order so each step goes cleaner, faster, and with less loss.
For most hunters and home processors, the right setup comes down to a few core jobs. You need to skin and break down the carcass safely. You need to trim, grind, mix, and package meat in a way that fits your household. If you make sausage, jerky, snack sticks, or burger year after year, quality equipment pays for itself in saved time and better meat.
What the best deer processing equipment really includes
A lot of folks start by shopping for a grinder first, and that makes sense. But deer processing is a full chain, not a single machine. The best deer processing equipment usually includes a sturdy butcher saw or meat saw, dependable knives, a grinder sized for your batch volume, a sausage stuffer if you make links, mixing tubs or lugs, a vacuum sealer, and the basic accessories that keep the work moving.
That does not mean every hunter needs a commercial room full of stainless steel. A family processing one or two deer a season has different needs than a ranch household, camp, or small market operation handling several animals in a short window. The mistake is buying too small for your real workload or buying light-duty equipment that sounds good in the box but struggles once sinew, silver skin, and cold meat get involved.
Start with the tools that touch the animal first
Before grinding ever begins, your cutting tools do most of the heavy lifting. A sharp skinning knife and a boning or butcher knife matter more than many people want to admit. When the edge is right and the handle feels secure with wet hands, you work cleaner and save more meat along the bone.
A butcher saw earns its place when you are splitting bone, working through ribs, or breaking down quarters with control. Some hunters prefer to avoid cutting through as much bone as possible, especially when they are boning out every piece for burger or sausage. That is a fair approach. Still, a dependable saw is one of those tools that proves its value the minute you need it.
Work surfaces matter too. If your table wobbles, your tubs are shallow, or your cutting area is hard to sanitize, the whole job gets harder. Good processing is not fancy. It is orderly.
Knives and saws should favor control over gimmicks
There is no shortage of flashy knife sets sold to hunters every fall. Most experienced hands know better. You want steel that holds an edge, handles that stay secure, and a saw built for repeated use. Fancy coatings and oversized profiles do not help much if the blade drags or the frame loosens up after a season.This is why we sell F. Dick knives and cleavers. They have been making Knives and tools in Germany since 1778...You can see some of them here.
Choosing the right grinder for deer meat
If there is one machine that defines a home processing setup, it is the grinder. Deer meat is lean, fibrous, and often processed in large batches all at once. That means grinder size is not just a convenience question. It affects heat buildup, texture, and how long you stay at the table.
For one or two deer a year, a solid electric grinder can be enough, especially if you cube the meat well and keep everything cold. If you regularly process multiple deer, make burger blends, or run sausage in volume, stepping up to a heavier grinder makes good sense. Bigger throat sizes and stronger motors reduce prep time and keep the machine from bogging down.
The plate and knife setup also matters. Coarse plates work well for first passes, chili meat, and sausage prep. Finer plates finish burger or smooth sausage. Many processors get better results with a two-pass grind instead of trying to force cold venison and pork trim through a fine plate on the first run.
Bigger is not always better, but too small gets old fast
A heavy grinder takes more room and costs more up front. That is the trade-off. But undersized machines often turn deer season into an all-day bottleneck. If you already know your family, hunting partners, or customers will be processing volume every year, buying the right machine once is usually the cheaper path.
Sausage stuffers, mixers, and the tools that make venison go further
A lot of deer meat ends up as burger because it is simple. There is nothing wrong with that. But the right equipment opens up better use of trim and tougher cuts. Sausage stuffers, hand or electric mixers, seasoning supplies, and meat lugs turn venison into breakfast sausage, summer sausage, snack sticks, and fresh links that actually get eaten.
A dedicated sausage stuffer is worth having if you make links with any regularity. Trying to stuff casings through a grinder can work in a pinch, but it is slower and rougher on the meat texture. A real stuffer gives you better control, cleaner fill, and less frustration.
Mixing is another step many people underestimate. Even seasoning distribution and proper bind matter, especially when you are blending venison with pork fat. A good mixer or roomy lug helps you season thoroughly without warming the meat too much by overhandling it.
Packaging equipment makes the difference in the freezer
You can do a fine job butchering and grinding and still ruin good venison with poor packaging. Freezer burn, loose wrap, and leaky bags waste meat you worked hard to put up. That is why vacuum sealers rank near the top of the best deer processing equipment for home and small-shop use.
A vacuum chamber sealer or dependable vacuum sealer gives you cleaner, tighter packages with better shelf life than old-style wrap alone. It also helps with portion control. Burger, steaks, backstrap medallions, stew meat, and sausage all store better when packed in meal-ready amounts.
Some folks still prefer butcher paper for certain cuts, and there is a place for that. But if you process enough venison to last through the year, vacuum sealing saves time later and protects quality better over the long haul.
Do not overlook the parts that keeps the work moving
The big machines get the attention, but the smaller pieces are often what keep a processing day from going sideways. Extra grinder plates and knives, stompers, replacement stuffer tubes, meat tubs, scales, thermometers, cut-resistant gloves, hooks, and sharpening tools are not exciting purchases. They are still part of a serious setup.
This is especially true if you process during a narrow weather window or have several animals to handle back-to-back. One dull blade, one cracked plastic part, or one missing plate can stop the whole job. That is why practical folks tend to buy equipment from a supplier that understands parts, accessories, and replacement needs, not just one-time sales.
Matching deer processing equipment to your kind of operation
The best setup depends on what kind of processor you are. A weekend hunter with one freezer and one or two deer each season can do excellent work with a modest but dependable bench setup. A family that hunts hard, helps neighbors, and puts up sausage every winter should look at heavier grinders, larger stuffers, and better packaging equipment from the start.
For small butcher shops, farm stores, delis, or local processors, durability becomes even more important. Motors run longer, cleanup happens more often, and downtime costs money. Commercial-grade equipment may cost more up front, but if it keeps production steady through peak season, it earns its keep.
That is where an old-fashioned catalog business still matters. Stores like Heinsohn's Country Store have stayed useful because they carry the hard-to-find equipment, parts, and practical tools that real processors need, whether you are handling one deer in a barn shed or running steady volume for paying customers.
What to look for before you buy
Country people usually know when a tool is made for work and when it is made for display. Look for metal construction where it counts, motors sized for actual use, replaceable wear parts, and simple cleanup. Ask yourself how often you will use it, how much meat you handle in a day, and whether you need household capacity or small-business strength.
Also think about storage and power. A large grinder is a blessing in season and a burden if you have nowhere to keep it. A hand-crank tool can still make good sense in the right shop, especially for smaller batches or backup use. It depends on your volume, your space, and how you like to work.
Good deer processing has always been about respect for the animal and thrift for the household. The right equipment supports both. Buy tools that work hard, clean up right, and hold up season after season, and your processing table will serve your family better every fall.
8 Key Steps in Meat Processing
A good batch of meat can be ruined long before it ever hits the skillet. Most problems come from rushing, warm temperatures, dull tools, or skipping one of the basic steps in meat processing that keep quality high and waste low. Whether you are handling a deer at home, putting up sausage for the family, or running a small shop, the work goes better when you follow a clear order and use the right tools for the job.
Meat processing is part skill, part timing, and part equipment. There is no single method that fits every animal or every operation, but the same core stages show up again and again. Once you understand what each step is meant to do, it is easier to choose the proper grinder, stuffer, saw, knife, sealer, or prep table for your setup.
Why the order matters in meat processing
The order of work affects safety, texture, flavor, and shelf life. If meat stays warm too long, bacteria grow faster and fat starts to smear. If trimming is careless, you end up grinding sinew, bruised tissue, glands, or hair into your finished product. If packaging is sloppy, freezer burn and off flavors show up sooner than they should.
That is why experienced processors work in a steady sequence. They chill first, trim clean, portion correctly, and only then move to grinding, mixing, stuffing, or wrapping. Good processing is not fancy. It is careful, consistent work done with dependable equipment.
1. Harvesting and initial handling
The first of the steps in meat processing starts right in the field or at the point of slaughter. Clean handling matters from the very beginning. The goal is to bleed properly when appropriate, avoid contamination, and move the carcass out of heat and dirt as quickly as possible.
For hunters, that means prompt field dressing and keeping the cavity clean. For livestock processing, it means maintaining a sanitary work area and controlling contact with hide, hair, digestive contents, and dirty surfaces. This stage sets the tone for everything that follows. You cannot clean your way out of a poor start.
2. Chilling the carcass
After initial handling, the meat needs to cool down fast and evenly. Chilling helps protect quality and gives the muscle time to firm up, which makes later cutting much easier. Warm meat is harder to trim neatly, harder to grind well, and more likely to lose texture.
How long you chill depends on the species, carcass size, and your intended use. A deer quarter is different from a hog, and both are different from boxed beef in a small commercial cooler. The main point is simple - keep temperatures controlled and do not let meat sit around in the danger zone.
Some folks prefer a short aging period for tenderness and flavor, especially with beef or venison. That can improve eating quality, but only if temperature and cleanliness are managed correctly. Aging is not the same as neglect.
3. Skinning, scalding, or removing feathers
Before cutting meat into usable portions, the outer covering has to come off. With game and beef, that usually means skinning. With hogs, it may mean skinning or scalding and scraping, depending on the end product. Poultry follows its own process with scalding and feather removal.
This step sounds straightforward, but it takes care to avoid dragging hair, dirt, or feathers onto exposed meat. Sharp knives help. So does having enough space to work. A clean gambrel setup, solid hooks, and sturdy tables save time and help maintain order when you are processing more than one animal.
4. Evisceration and inspection
Removing the internal organs is one of the most critical stages. Done correctly, it protects the meat from contamination and allows you to check overall condition. Done poorly, it can spoil a whole carcass in short order.
This is where steady hands matter more than speed. You want clean cuts and clear separation of edible organs from waste. For hunters and home processors, this is also the point where you pay attention to anything unusual in color, smell, or tissue condition. If something seems wrong, it deserves a closer look before the meat moves any farther down the line.
5. Breaking down into primal and retail cuts
Once the carcass is cooled and cleaned, the next step is cutting it into manageable sections. Larger carcasses are usually broken into primals first, then into subprimals and retail cuts. Smaller game may move straight into roasts, steaks, stew meat, or trim for grinding.
This stage is where a good butcher saw and sharp boning knives earn their keep. The right tools let you make clean cuts without hacking through bone or tearing muscle. Better cuts look better in the package, cook more evenly, and waste less meat.
It also helps to know your end use before you start cutting. If the family wants burger, sausage, and a few roasts, you will process differently than if you are aiming for chops, steaks, and case-ready cuts for sale. There is always a trade-off between speed, appearance, and yield. A thoughtful cutting plan helps you get the balance right.
6. Trimming and sorting
After the main cuts are made, trimming begins. This is where silver skin, excess fat, bruised tissue, bloodshot areas, glands, and tough connective tissue are removed. Not every product calls for the same trim standard. Sausage trim is different from steak trim, and game often needs more careful cleanup than domestic meat.
Sorting meat at this point makes the rest of the process smoother. Lean trim can be separated from fatty trim. Roasts can be set aside from stew cubes. Better cuts can go to the freezer whole while lower-value cuts move to the grinder. When everything is piled together, mistakes happen and product quality usually slips.
This is also the time to decide whether you need added fat. Venison, for example, is often too lean on its own for certain sausages or burger blends. Adding pork fat can improve texture and moisture, but the exact ratio depends on the product and how it will be cooked.
7. Grinding, mixing, and stuffing
For many households and small processors, this is the most familiar part of the steps in meat processing. Ground meat and sausage are practical, versatile, and a good use for trim. Still, this stage is where heat and poor equipment can do real damage.
Meat should stay cold going into the grinder. Plates and knives need to be sharp and fitted correctly. If the grinder smears fat instead of cutting clean, the final product will suffer in both texture and appearance. A dependable electric grinder can save a lot of labor, but a well-built manual unit still has its place for lighter work or backup duty.
After grinding, seasoning and mixing come next. Uniform mixing helps with flavor and bind, especially in sausage. Overmixing, though, can make some products too dense. It depends on what you are making. Fresh breakfast sausage,
If you are stuffing casings, a proper sausage stuffer makes the job cleaner and faster than trying to force seasoned meat through a grinder attachment. Casings should be prepared correctly, air pockets minimized, and links handled gently so they cook and store well.
8. Packaging, labeling, and storage
The final stage protects all the work that came before it. Meat that is cut well and ground properly still needs sound packaging if it is going to hold quality in the cooler or freezer. Air is the enemy here. So are leaks, weak seals, and vague labels.
Freezer paper works for some users, while vacuum sealing offers better long-term protection for many cuts. Chamber sealers can be especially useful for those processing larger quantities or packing wet products. Whatever method you use, label clearly with cut, weight or portion, and date. A neat package saves confusion later and helps rotate stock the right way.
Storage time depends on the product, fat content, and packaging quality. Lean cuts generally hold differently than fatty sausage. Fresh sausage is different from cured product. The better your packaging and temperature control, the better your results over time.
Good equipment makes every step easier
You do not need a full commercial plant to do honest, dependable work, but you do need tools that match your volume. A family putting up a deer or two each season has different needs than a small butcher shop filling weekly orders. That is where practical equipment choices matter.
A solid grinder, a sturdy sausage stuffer, sharp knives, a butcher saw, dependable scales, and quality vacuum packaging equipment cover a lot of ground. Replacement parts matter too. If a gasket, plate, knife, or tube fails in the middle of processing day, having the right part on hand saves time and protects the product.
That practical approach is why folks who care about quality country living pay attention to tool quality. At Heinsohn's Country Store, that same old-fashioned thinking still applies - buy dependable equipment, take care of it, and it will serve your family or business well for years.
The work of processing meat has never been about shortcuts. It is about doing each stage right, respecting the animal, and putting wholesome food on the table with confidence. When you take the steps in order and use equipment built for real work, the results speak for themselves.
What Does Meat Processing Mean?
If you have ever stood over a deer, a hog, or a side of beef and wondered what comes next, you are really asking, what does meat processing mean? In plain terms, meat processing means taking raw animal meat and preparing it so it can be cut, ground, seasoned, preserved, packaged, and used safely for the table or for sale. Sometimes that is as simple as trimming and wrapping steaks. Other times it means grinding burger, mixing sausage, curing hams, smoking links, or sealing bulk meat for the freezer.
What does meat processing mean in practical terms?
Around the house, on the ranch, or in a small shop, meat processing is the hands-on work that turns an animal or primal cut into usable food. It includes breaking meat down into manageable pieces, removing bone or excess fat when needed, sorting cuts, and preparing each portion for cooking, storage, or further processing.
That last part matters. Meat processing does not always mean the same thing for every person. For a hunter, it may mean skinning, trimming silver skin, grinding trim into burger, and vacuum sealing packages for the season. For a sausage maker, it may mean controlling fat ratio, seasoning carefully, stuffing casings, and keeping temperatures steady. For a butcher shop or local deli, it may include slicing, portion control, curing, smoking, labeling, and making products that are ready for customers.
So the short answer is this: meat processing means converting raw meat into a form that is safer, more useful, easier to store, and better suited to how you plan to cook or sell it.
Meat processing starts with cutting and trimming
The first stage is usually basic breakdown. That means separating large sections into smaller cuts and trimming away what you do not want. Depending on the animal and the goal, that can include bone, glands, connective tissue, bruised areas, excess fat, or tough membrane.
This step takes judgment. Leave too much waste on the meat, and quality suffers. Trim too aggressively, and you throw away usable product. Folks who process their own meat learn fast that a steady hand and the right tools save money. A dependable butcher knife, meat saw, cutting board, and grinder do more than make the job easier. They help you keep cleaner cuts and make better use of the animal.
For many families, this is where the value of home processing shows up. You decide what becomes roast, steak, stew meat, soup bone, or grind. You are not paying someone else to make those choices for you.
Grinding changes the meat for a different use
Once trim has been sorted, grinding is one of the most common forms of meat processing. Ground meat is not just meat chopped small. Good grinding controls texture, fat content, and consistency.
That is why grinder size, plate choice, and meat temperature all matter. A coarse grind works well for chili meat, burger blends, and some sausage styles. A finer grind may be better for hot dogs, snack sticks, or smooth sausage. Warm meat can smear fat and leave you with poor texture. Cold meat cuts cleaner and processes better.
For a home user, grinding often means turning trim into hamburger or sausage instead of letting good meat go to waste. For a small business, it can mean creating a repeatable product that customers count on.
Seasoning, mixing, and stuffing are part of meat processing too
A lot of people hear the term and think only of butchering. But meat processing also includes what happens after the knife work. Once meat is cut or ground, it may be mixed with spices, cure, binder, or added fat to produce sausage, jerky, summer sausage, or cured meats.
Mixing is more than stirring ingredients together. It develops the bind in sausage and helps the finished product hold moisture and texture. Under-mixed sausage can crumble. Overworked meat can become pasty. That is one of those areas where experience pays off.
Stuffing comes next for many products. Natural casings, collagen casings, and fibrous casings all have their place. Fresh breakfast sausage is different from smoked sausage, and both are different from snack sticks or bologna. The equipment needs are different too. A hand-crank stuffer may suit a household making a few pounds at a time. A larger vertical stuffer makes more sense if you are processing in volume.
Curing and smoking are specialized forms of processing
Not every meat product is fresh. Curing and smoking are older methods that still matter today because they improve flavor, help preserve meat, and create products people know and trust.
Curing usually involves salt and, in many cases, curing agents used in proper amounts for food safety and color development. Smoking adds flavor and, depending on the process, can also help with preservation. Bacon, ham, smoked sausage, and jerky all fall under this broader part of meat processing.
This is where shortcuts can get a person in trouble. Cure levels, temperatures, and hold times need to be handled correctly. Old-fashioned methods still require careful practice. Tradition works best when it is backed by sound process and dependable equipment.
Packaging and storage matter just as much as cutting
A man can process a fine batch of meat and still lose quality at the end if he packages it poorly. Meat processing includes wrapping, sealing, labeling, and storing meat so it holds up in the freezer or cooler.
Freezer paper works for some jobs. Vacuum sealing gives better protection against freezer burn and helps keep product quality longer. Clear labeling is part of the work too, especially when you are handling several cuts, different sausage recipes, or multiple animals.
For families putting up meat for the year, packaging is not an afterthought. It is what protects all the labor that came before it. For small processors, it is part of presenting a clean, professional product.
Meat processing can be simple or highly involved
One reason people ask what does meat processing mean is that the phrase covers a lot of ground. It can mean a basic home setup with a grinder, knives, and a sealer. It can also mean a commercial operation with mixers, slicers, stuffers, saws, smokehouses, and sanitation procedures.
Neither one is more legitimate than the other. It depends on the job. If you process one deer each season, your needs are different from a family that raises hogs, makes sausage year-round, and stocks freezers for several households. A small restaurant or local market has another level of demand altogether.
That is why the right tools for the job matter so much. Light-duty equipment may be fine for occasional use. If you are grinding fifty pounds at a time or making sausage on a regular schedule, heavier equipment pays for itself in time, effort, and fewer breakdowns.
Safety is built into the meaning of meat processing
There is no honest way to talk about meat processing without talking about food safety. Clean surfaces, cold meat, proper handwashing, sanitized tools, and correct storage temperatures are part of the work. So is knowing when meat should be used fresh, frozen, cured, or cooked.
This is especially true when grinding meat, since grinding spreads surface bacteria throughout the batch. It is also true with cured and smoked products, where temperature control and proper ingredients matter.
In other words, meat processing is not just changing the form of meat. It is doing it in a way that protects quality and keeps food fit to eat.
Why meat processing still matters
For country families, hunters, homesteaders, and small meat businesses, meat processing is tied to self-reliance. It lets you use more of what you harvest or raise. It gives you control over thickness, grind, seasoning, portion size, and packaging. It can save money over time, but just as often it is about doing the work right and knowing what is in your food.
It also keeps old skills alive. Sausage making, curing, smoking, and home butchering are not passing fads. They are practical trades that still serve the American family well. Good equipment makes those jobs easier, but the real value is in having the know-how to put meat on the table your own way.
At Heinsohn's Country Store, that kind of work is understood for what it is - honest labor that deserves dependable tools.
So what does meat processing mean for you?
It may mean a cleaner way to handle game after a hunt. It may mean making your own burger and sausage instead of paying custom rates. It may mean adding cured meats, smoked products, or packaged cuts to a small business. Or it may simply mean learning a useful country skill that gives your household more independence.
However far you take it, meat processing means turning raw meat into something practical, well-prepared, and ready for the next step. When you take care with the cutting, the grinding, the seasoning, the packaging, and the storage, you are not just processing meat. You are making the most of good food with the kind of workmanship that still counts.
10 Best Sausage Making Spices
A good batch of sausage can be spoiled faster by poor seasoning than by poor grinding. That is why common sausage seasonings matter so much. Whether you are making breakfast sausage for the freezer, venison links after deer season, or smoked rings for the family table, the right blend has to do three jobs at once - bring out the meat, hold up during cooking, and give you a flavor people want again.
Folks who process their own meat usually learn this the practical way. Salt is easy to underestimate. Sage can take over in a hurry. Red pepper may taste just right in the mixing tub and still come on too strong after the sausage rests overnight. Seasoning is where old-fashioned know-how pays off.
The common sausage seasonings most makers start with
Across fresh sausage, smoked sausage, and cured sausage, a few seasonings show up again and again because they simply work. Salt is the foundation. It is not just there for taste. It helps pull protein from the meat so the finished sausage slices better, binds better, and cooks with a more even texture.
Black pepper is close behind. It gives sausage a familiar backbone without covering up pork, beef, or wild game. Many traditional blends rely on black pepper more than heat-heavy peppers because it adds bite without turning every batch into hot sausage.
Sage is one of the best-known breakfast sausage seasonings, especially with pork. It brings that old-country flavor many people expect in pan sausage or patties. The trade-off is that a little goes a long way. Too much sage can make a batch taste dusty or medicinal.
Red pepper and cayenne are common where folks want heat, especially in Southern-style links and smoked sausage. Paprika is also widely used, though its role depends on the type. Sweet paprika adds color and a mild pepper note. Hot paprika pushes the heat higher.
Garlic, whether fresh, granulated, or powdered, is another standard. It works well in pork sausage, beef sausage, and game sausage because it rounds out the blend and gives the meat a fuller taste. Onion powder often works alongside it, especially when a recipe needs a savory edge without chunks of fresh onion affecting texture.
Then there are the background spices that do quiet but important work. Thyme, marjoram, mustard seed, coriander, nutmeg, fennel, and allspice each show up in regional and traditional recipes. You may not always pick them out one by one, but they help define the style of sausage you are making.
How common sausage seasonings change by sausage style
The same spice rack will not give every sausage the same results. Style matters.
Fresh breakfast sausage
Fresh breakfast sausage usually stays simple. Salt, black pepper, sage, and red pepper flakes are the backbone. Some makers add a little thyme or marjoram for more depth. Brown sugar or maple flavor may be used in some households, but the seasoning still needs to stay meat-forward. If the sweet note gets too high, it starts tasting more like a novelty than a working-man's breakfast sausage.
Smoked sausage
Smoked sausage can carry stronger seasoning because smoke itself adds another layer. Garlic, black pepper, paprika, mustard seed, and cayenne are common choices. In these batches, seasoning has to stand up to both the smoke and the richer flavor that comes from longer cooking. A blend that tastes bold in fresh sausage may taste balanced once it is smoked.
Italian-style sausage
For Italian-style sausage, fennel is the marker most people recognize first. Garlic, black pepper, paprika, and sometimes a little anise or red pepper are common companions. Sweet versions lean more on fennel and garlic. Hot versions use more crushed red pepper. Here again, balance matters. Too much fennel can crowd out everything else.
Game sausage
Venison, wild hog, and other game meats often need a little more support from seasoning, but not enough to bury the natural flavor. Garlic, black pepper, sage, coriander, mustard, and red pepper all work well. If game has a stronger flavor, many makers use pork trim and a seasoning blend with a little more body. That is usually better than trying to fix weak meat ratio with extra spice alone.
What each seasoning really does
A lot of home recipes list ingredients without explaining the job each one does. That is where batches go off track.
Salt is non-negotiable. Beyond flavor, it affects bind and texture. If the salt level is too low, sausage can taste flat and cook up crumbly. If it is too high, no amount of extra meat can fully save it.
Black pepper gives sharpness and finish. It is one of the easiest ways to make sausage taste fuller without making it hot.
Sage gives warmth and that familiar country breakfast profile. It fits pork especially well.
Garlic and onion build savory depth. They are useful when sausage needs more body but not necessarily more heat.
Paprika improves color and gives mild pepper flavor. In smoked sausage, that color can be part of the appeal.
Cayenne and crushed red pepper bring direct heat. These should be measured with care. Heat tends to become more pronounced after the seasoning has time to rest in the meat.
Fennel gives a sweet, aromatic character. It is a defining flavor in many Italian-style sausages.
Mustard seed, coriander, thyme, and marjoram fill in the edges. They are often what makes a blend taste finished rather than one-dimensional.
Why seasoning balance matters more than adding more spice
The common mistake is thinking stronger sausage means more of everything. Usually it means the opposite. A good sausage blend has a lead flavor, support flavors, and enough salt and pepper to make the meat taste alive.
If sage, fennel, garlic, cayenne, and paprika all fight for first place, the batch gets muddy. You still taste seasoning, but you do not taste a clear sausage style. That matters whether you are feeding family or making product for customers.
It also depends on how the sausage will be served. A breakfast patty beside eggs can handle a direct sage and pepper flavor. A smoked link served on a bun may need more garlic and paprika so it does not get lost. A venison sausage for chili or gumbo may need a cleaner profile so it works in the final dish.
Start small, test early, and write it down
Experienced sausage makers nearly always do one thing beginners skip. They fry a small test patty before stuffing the whole batch.
That quick test tells you if the salt is right, whether the pepper is too light, or if the garlic is getting ahead of the meat. Keep in mind that chilled sausage often tastes a little stronger after resting, especially with garlic, sage, and pepper, so do not chase perfection by over-correcting a warm test sample.
It also pays to keep notes. Write down the meat blend, fat ratio, seasoning amounts, and how the cooked sausage turned out. The best homemade sausage is rarely a lucky batch. It is usually a repeatable one.
Pre-mixed blends or build your own?
There is room for both, and the right choice depends on your setup.
Pre-mixed seasoning blends save time, improve consistency, and make sense when you are running repeated batches. That matters for busy households, deer processors, and small meat operations that need dependable results. A good blend also cuts down on measuring errors, which is no small thing when you are making 25 or 50 pounds at a time.
Building your own blend gives more control. That can be worthwhile if you know exactly what you want - more sage in breakfast sausage, less heat in a smoked link, more garlic for wild game. The trade-off is that scratch blending leaves more room for inconsistency unless you measure carefully every time.
At Heinsohns Country Store, that practical difference is easy to understand. The right tools for the job matter, and seasoning is no different. Consistency counts.
Common problems with sausage seasoning
If sausage tastes bland, the usual problem is not a lack of exotic spices. More often, it needs enough salt, black pepper, or garlic to wake up the meat.
If it tastes harsh, one seasoning may be too far out front. Sage, cayenne, and fennel are common culprits because they can dominate a blend quickly.
If the flavor seems uneven, the seasoning may not have been mixed thoroughly. Good distribution matters as much as the recipe. A batch should be mixed until the meat gets tacky and the spices are well worked through.
And if the sausage tastes right fresh but wrong after cooking, think about method. Smoking, grilling, frying, and baking all shape the final flavor. A heavily peppered sausage may taste just right smoked low and slow, but too sharp in a skillet.
Knowing the common sausage seasonings is useful, but knowing how they behave in real meat is what separates a fair batch from a good one. Start with the basics, respect the balance, and give yourself room to adjust. A dependable seasoning blend is not fancy. It is one you can trust every time you put meat in the grinder.
Common Sausage Seasonings That Work
A good sausage can be ruined long before it ever hits the smoker or skillet. Most of the time, the problem is not the meat - it is the seasoning. If you are choosing spices to make sausage, the real job is building a blend that fits the meat, the fat, and the way you plan to cook it.
That matters whether you are grinding a deer from last season, putting up pork from the farm, or making a few small batches in the home kitchen. Sausage seasoning is not guesswork, but it is not one-size-fits-all either. A breakfast link needs a different hand than a smoked rope sausage, and wild game usually needs a little more help than well-marbled pork.
The core spices to make sausage
At the center of nearly every good sausage is salt. It is not just there for flavor. Salt helps pull protein from the meat so the mixture binds properly and gives you that firm, sliceable texture people expect. If the salt level is too low, sausage can taste flat and crumbly no matter how many other spices you add.
Black pepper is the next workhorse. It gives sausage a steady warmth without pushing too hard in one direction. Coarse ground black pepper gives a more traditional country texture, while a finer grind spreads more evenly through the mix. Either can work, but the style of sausage should decide it.
Garlic is one of the most dependable flavor builders in sausage making. Garlic powder is often easier to distribute evenly than fresh garlic, especially in larger batches. Fresh garlic has good flavor, but it can be sharper and less predictable if the batch is going to be smoked or held for a while.
Paprika is another staple, especially in smoked or semi-dry styles. Sweet paprika adds color and mild pepper flavor. Hot paprika can bring more bite. Paprika does not usually lead the blend, but it fills out the middle and gives sausage a fuller taste.
Then come the spices that shape the direction of the batch. Sage says breakfast sausage. Fennel says Italian. Mustard seed leans toward bratwurst and some old-style country blends. Coriander shows up in many smoked sausages because it brings a clean, slightly citrus note that cuts through rich fat.
Matching the spice blend to the sausage style
The easiest mistake is trying to use the same seasoning mix for every kind of sausage. Good sausage making is practical. You match the blend to the end use.
Breakfast sausage
For breakfast sausage, sage is usually the backbone. Black pepper, salt, and a little red pepper round it out. Some folks like thyme, marjoram, nutmeg, or a touch of brown sugar. The sugar should stay in the background. If it starts tasting like pancake syrup seasoning, the batch has gone too far.
Pork handles breakfast seasoning especially well because it has enough natural fat to carry the herbs. Venison breakfast sausage can be excellent too, but it usually benefits from added pork fat and a little extra seasoning. Lean meat can make herbs taste thin if the mix is underbuilt.
Italian sausage
Fennel seed is the marker here. Some like it whole for a stronger bite, others prefer cracked or ground. Garlic, black pepper, paprika, and parsley are common supporting flavors. If you want sweet Italian sausage, keep the heat low and let the fennel do the talking. For hot Italian, add crushed red pepper and let it ride a little harder.
Italian sausage needs balance. Too much fennel can make it taste like candy. Too much red pepper can bury the pork.
Bratwurst and mild fresh sausage
Bratwurst tends to lean milder and smoother than many country sausages. White pepper, nutmeg, ginger, and mustard can all play a part. These are not heavy-handed flavors. They need a careful hand, especially nutmeg and ginger. A little adds character. Too much makes the whole batch taste out of place.
This is where measuring matters. Mild sausages can go wrong fast because there is nowhere to hide a spice mistake.
Smoked sausage
Smoked sausage often calls for garlic, black pepper, paprika, mustard seed, and coriander. Cayenne or red pepper can be added if you want a little kick. These sausages need seasoning that can stand up to smoke without disappearing behind it.
If you are using curing salt for a smoked product, remember that cure is not a substitute for flavor seasoning. It handles food safety and color development in the right applications, but you still need a proper spice blend to make the sausage worth eating.
Best herbs and spices for wild game sausage
Wild game is where seasoning earns its keep. Deer, elk, and other game meats are leaner than pork, and they carry a different flavor profile. That does not mean you need to cover them up. It means you need to season with purpose.
Garlic, black pepper, sage, coriander, and red pepper all work well with venison. Juniper can also fit game sausage, but it is strong and best used in small amounts. If you are making fresh links for the skillet, sage and pepper keep things familiar. If you are making smoked venison sausage, garlic, mustard seed, paprika, and coriander usually give a more solid result.
Fennel can work in venison sausage, but not every batch wants it. If the game flavor is pronounced, fennel may clash rather than help. That is one of those it-depends choices. The same goes for sweet spices like allspice or clove. In some regional sausages they belong. In a basic country venison sausage, they can take over.
Fat matters here too. Most wild game sausage needs added pork fat or fatty pork trim. Without it, even a good seasoning blend can eat dry and harsh.
Whole spices or ground spices
Both have their place. Ground spices mix evenly and are easier to control in smaller home batches. They are often the better choice for snack sticks, emulsified sausage, and any batch where you want a consistent flavor from one bite to the next.
Whole or cracked spices bring more texture and a more old-fashioned look. Coarse black pepper, mustard seed, and fennel seed are good examples. They work especially well in rustic fresh sausage and smoked links where a little visible spice is part of the appeal.
Freshness counts either way. Old spices lose strength, and that leads people to over-season one batch and under-season the next. If the jar has been sitting in the cabinet since your last grinder upgrade, it may be time to start fresh.
How much spice to use
This is where many home sausage makers either get cautious or get carried away. The smart approach is to think in percentages or in measured amounts per pound of meat, then keep good notes. Repeatable sausage comes from repeatable measuring.
Salt is the one ingredient you should never estimate by eye. The same goes for cure when a recipe calls for it. For the rest of the spice blend, small changes make a real difference. Half a teaspoon of sage or cayenne can change the whole batch.
A good practice is to fry a small test patty before stuffing. That lets you check the seasoning while there is still time to adjust. Keep in mind that flavors often settle and blend more fully after the seasoned meat rests in the cooler, so a test patty gives you a close read, not a final one.
Common seasoning mistakes
The biggest mistake is under-salting. People worry about making sausage too salty, so they hold back. Then the finished product tastes dull. The second mistake is trying to fix weak seasoning by dumping in heat. Cayenne can add life, but it cannot replace depth.
Another common problem is using too many spices at once. A reliable sausage does not need every jar on the shelf. In fact, the best country sausage recipes are often built on a short list of well-chosen seasonings. Salt, pepper, garlic, and one or two defining spices will beat a confused blend almost every time.
Temperature matters too. If the meat gets too warm while mixing, the texture suffers and the seasoning distribution can suffer with it. Good spice blends still need proper handling and the right tools for the job.
Building a dependable sausage blend
If you are just getting started, begin with one sausage style and learn it well. A simple breakfast sausage, Italian sausage, or smoked pork sausage will teach you more than chasing six styles at once. Keep the recipe plain enough that you can taste what each spice is doing.
Over time, you can build your own house blend. That is how a lot of country sausage recipes come together - not by chasing trends, but by making a batch, cooking it, adjusting it, and writing it down. That steady approach works for the family kitchen, the deer camp, and the small shop the same way.
Heinsohns Country Store has long served folks who want dependable equipment and supplies for doing this work right, and sausage seasoning is no different. Good meat deserves a good blend, and a good blend starts with practical choices, careful measuring, and enough patience to learn what your sausage really wants.
The best spice mix is not the fanciest one on paper. It is the one that fits your meat, holds up in the pan or smokehouse, and makes people reach for a second link.
Best Spices to Make Sausage at Home
If you have ever made a batch of sausage that looked right but tasted flat, the trouble usually was not the grinder or the stuffer. It was the seasoning. The best sausage making spices do more than add flavor. They build balance, bring out the character of the meat, and help one batch taste as dependable as the last.
Good sausage seasoning is part tradition and part judgment. Pork likes a different hand than venison. Fresh breakfast links call for a different spice profile than smoked jalapeno cheddar sausage or a country-style pan sausage. A man processing a deer in the fall and a small-town butcher filling a weekly order both need the same thing - spices that work, measurements that make sense, and results that hold up from one run to the next.
What makes the best sausage making spices
The first thing to understand is that not every strong spice belongs in every sausage. A good sausage blend has a job to do. Salt wakes up the meat. Black pepper adds bite. Sage gives breakfast sausage its familiar country smell. Paprika can bring color, sweetness, or mild warmth depending on the type. Red pepper and cayenne can push heat fast, so a little goes a long way.
Freshness matters just as much as selection. A spice that has sat too long on a warm pantry shelf loses the oils that carry flavor. That is why dependable sausage makers keep a working supply of the basics and replace them before they go stale. Whole spices can hold longer than pre-ground, but most home and shop operations want the convenience and consistency of ground seasonings that are ready to mix. This is one eason we like the premix packets because we know that the seasoning is the freshest because it is blended when we order it. Often you are mixing it into your sausage within a week of it being ground and mixed!
The other part is balance. A sausage should taste seasoned, not buried. If the garlic is all you notice, the blend is off. If the pepper burns before the pork flavor comes through, the blend is off. The best seasoning work is steady and honest. You taste the meat first, then the spice, then the finish.
10 best sausage making spices for everyday use
1. Black pepper
Black pepper belongs in nearly every sausage room. It gives backbone to fresh sausage, smoked links, and wild game blends. Fine grind spreads evenly, while coarse grind gives more visible texture and sharper bursts of flavor. If you only kept one spice besides salt, black pepper would be the safest bet.
2. Sage
For breakfast sausage and country pan sausage, sage is hard to beat. It gives that old-fashioned flavor most folks expect when sausage hits a hot skillet in the morning. Rubbed sage is common, but ground sage mixes more evenly in larger batches. Too much can turn bitter, so this is one to measure with care.
3. Red pepper
Red pepper flakes or ground red pepper bring heat and a little rough country character. It is a natural fit for hot pork sausage and many Southern-style recipes. The trade-off is that heat builds as sausage sits, so a blend that tastes mild during mixing may taste hotter after a day in the cooler.
4. Paprika
Paprika does more than color the meat. Sweet paprika adds mellow depth, while hot paprika pushes a stronger finish. It works especially well in smoked sausage and links where you want a richer, fuller profile without making the sausage overly spicy. If your sausage looks pale and tastes thin, paprika is often part of the fix.
5. Garlic
Garlic is one of the best sausage making spices because it fits so many styles. It works in fresh pork sausage, venison sausage, brat-style blends, and smoked links. Garlic powder usually gives more even distribution than minced garlic in large batches. Still, too much garlic can crowd out everything else, especially in mild sausage.
6. Mustard seed or mustard powder
Mustard gives sausage a subtle tang and a fuller savory note. It is common in bratwurst, beer sausage, and some smoked blends. Whole mustard seed gives texture and appearance, while mustard powder blends cleaner and more evenly. If you want a sausage to taste a little more finished without making it hotter, mustard is worth trying.
7. Coriander
Coriander has a light citrus edge that brightens heavier meats. It is often used in European-style sausages and pairs well with garlic, pepper, and mustard. For wild game sausage, coriander can help keep the flavor from turning muddy or overly dense. It is not a first-choice spice for every batch, but it earns its place in a well-stocked seasoning shelf.
8. Fennel
Fennel seed gives that familiar Italian sausage flavor. Sweet Italian sausage leans on fennel for its signature taste, while hot Italian sausage usually combines fennel with red pepper and garlic. Some folks love it and some do not, so it depends on the crowd you are feeding. In the right recipe, it is essential.
9. Nutmeg or mace
These two are used in smaller amounts, but they matter in many traditional sausage styles. Nutmeg brings a warm, rounded note to bratwurst, bologna-style sausage, and some old-world fresh links. Mace is similar but a little finer and sharper. Either one should stay in the background. If it stands out too much, the batch can taste sweet in the wrong way.
10. Thyme
Thyme is a quiet worker in sausage seasoning. It supports pork, poultry, and game without taking over. It pairs well with sage, black pepper, and garlic, especially in country-style sausage with a savory profile. If you want a blend to taste deeper and more complete, thyme often helps.
Choosing spices by sausage style
The best sausage making spices depend on what you are trying to make. Fresh breakfast sausage usually starts with salt, black pepper, sage, and sometimes a touch of red pepper or thyme. Italian sausage leans toward fennel, garlic, black pepper, and paprika, with heat added if you want the hot version. Smoked sausage often benefits from garlic, black pepper, paprika, mustard, and coriander.
Wild game is its own case. Venison, elk, and other lean meats usually need pork fat for texture, but they also need seasoning that can stand up to stronger flavor. Garlic, black pepper, paprika, coriander, and red pepper are common choices. Sage can work too, but usually in a lighter hand than with breakfast pork sausage.
For commercial kitchens, delis, and processing rooms, consistency matters just as much as flavor. If you are filling fifty pounds today and another fifty next week, a measured seasoning system beats guessing every time. That is where pre-mixed sausage seasonings can save labor and cut down on batch mistakes, especially when you need dependable flavor from one run to the next.
Whole spices, ground spices, and seasoning blends
There is no single right answer here. Ground spices mix faster and more evenly, which makes them practical for most sausage making. Whole spices can give stronger aroma and better shelf life, but they often need cracking or grinding before use. If you are running larger batches, extra steps slow the job down.
Seasoning blends also have their place. A quality blend takes the guesswork out of balance and helps avoid the common mistake of building a recipe too heavy on one note. That said, many experienced sausage makers like keeping single spices on hand for adjustment. A standard blend plus a little extra garlic, pepper, or paprika can help tailor a batch to your own table or customer base.
How to get better flavor from your spices
Measure by weight when you can. Spoon measurements work for small kitchen batches, but weight gives better repeatability. Mix your dry seasonings thoroughly before adding them to the meat so you do not get hot spots or bland spots in the grind.
Cold meat matters too. Seasonings distribute better when the meat and fat stay cold and firm during grinding and mixing. After mixing, fry a small test patty before stuffing the whole batch. That one step can save a lot of casing and a lot of disappointment. If a batch needs more salt, sage, or pepper, this is the time to fix it.
Storage matters more than many folks think. Keep spices sealed, dry, and out of heat and direct light. A hard-working sausage shop or home setup should turn stock often enough that nothing gets old and tired. Good meat deserves fresh seasoning.
A well-made sausage does not need fancy tricks. It needs the right spices, a steady hand, and the good sense to match the seasoning to the meat. Keep your basics close, learn what each spice brings to the table, and your next batch will taste like it was made by somebody who knows the job.
How to Use Sausage Stuffer Right
You can grind good meat, season it just right, and still ruin a batch at the last step if you do not know how to use sausage stuffer equipment properly. Stuffing is where texture, appearance, and yield can go wrong in a hurry. Too much pressure, warm meat, torn casings, or trapped air will leave you with split links and wasted work.
The good news is that sausage stuffing is not complicated once you understand the order of the job. A good stuffer, the right tube, cold meat, and a steady hand will carry you a long way. Whether you are making a few pounds for the family or putting up a larger batch for the freezer, the process stays much the same.
What a sausage stuffer does
A sausage stuffer is built to push prepared sausage meat into a casing evenly and with better control than a grinder attachment. That matters because sausage meat should be moved firmly but gently. When you try to stuff with a grinder, the mixture often gets worked too much, warms up, and loses some of the texture you want.
Dedicated stuffers also save time. A vertical or horizontal stuffer lets one person guide the casing while the machine does the pushing. For home butchering, wild game processing, and small shop work, that control makes a real difference.
How to use sausage stuffer equipment before you start
Before any meat goes into the cylinder, get your work area ready. Sausage making rewards preparation. Once the casing is loaded and the meat is in the canister, you do not want to stop and hunt for twine, pans, or a missing stuffer tube.
Start with cold equipment and cold sausage mixture. This is one of the biggest differences between a smooth run and a frustrating one. If the meat paste gets warm, fat can smear instead of staying distinct in the mix. The result is softer texture and poorer stuffing flow. Keep the seasoned meat chilled until you are ready to load it.
Choose the stuffing tube based on the casing size. A tube that is too large can tear the casing. Too small, and the casing may not feed well or may fill unevenly. Breakfast links, bratwurst, Italian sausage, and summer sausage all call for different casings and often different tube sizes.
If you are using natural casings, rinse them well and soak them according to the package directions. Most natural hog or sheep casings need a good soak in warm water and a flush through the inside to remove excess salt and help them slide onto the tube. Collagen casings are simpler to handle, but they still need the right size match.
Set out a sheet pan or clean tray to catch the finished coil. A little oil or water on the stuffing tube can help the casing slide on easier. Keep a pin or sausage pricker nearby for air pockets.
Loading the stuffer the right way
Take the sausage mixture and pack it firmly into the stuffer canister. The goal is to reduce air gaps as much as possible. If you drop loose handfuls into the cylinder and trap pockets between them, that air has to go somewhere later, and it usually ends up in the casing.
Press the meat down as you fill the canister. Do not mash it into a paste, but do pack it enough to make a solid load. Once the cylinder is filled, install the lid or plunger and bring the pressure down slowly.
Before you put the casing on the tube, crank or start the stuffer until a little meat comes through the end. This step pushes out trapped air from the tube. Then stop, slip the casing onto the horn, and leave a few inches hanging off the end for tying or twisting.
Stuffing sausages without tearing casings
This is where most folks learn by trial and error. The main rule is simple - do not overfill. A sausage should be full and firm, but it still needs enough give to twist into links later.
As the meat begins moving, hold the casing lightly in one hand and guide the filled sausage with the other. Let the stuffer do the work. If you grip too tightly, the casing can bind and split. If you let it run too loose, you may get soft, uneven sections.
Try to keep steady pressure on the crank or motor. Jerky starts and stops tend to create weak spots and air pockets. Manual stuffers often give better feel for beginners because you can slow down and correct as you go. Electric units move faster, which is helpful on larger batches, but they ask for a little more attention.
If a casing bursts, stop and back off the pressure if your machine allows it. Pinch off the filled section, remove the torn piece, and reload a fresh casing if needed. A burst usually means the casing was weak, too dry, mismatched to the tube, or stuffed too tight.
Linking and handling the finished coil
Once you have a full coil of stuffed sausage, do not rush straight into twisting if the casing feels drum tight. Let the coil rest a few minutes if needed. That can help the filling settle.
Measure the length of your links by eye or with your hand for consistency. Pinch at each point where you want a link, then twist. Many sausage makers twist every other link in the opposite direction so earlier links do not unwind. Another option is to twist them all one way and tie with butcher twine where needed. It depends on the style of sausage and the casing.
If you see small air pockets, prick them lightly with a sausage pricker or clean pin. Do not make a habit of punching holes all over the casing, but remove obvious bubbles before cooking or smoking. Excess air can cause uneven color, poor texture, and split spots later.
Common mistakes when learning how to use sausage stuffer tools
The most common problem is warm meat. If the mixture gets sticky, greasy, or loose, stop and chill it again. Cold sausage meat stuffs cleaner and holds together better.
The next mistake is using a grinder as a stuffer when you want consistent results. Some grinder attachments can do the job for very small batches, but they are usually slower and rougher on the meat. If you make sausage more than once in a while, a proper stuffer is the right tool for the job.
Another issue is poor casing prep. Dry natural casings tear easily. Casings that are not flushed can be difficult to load. Weak casings sometimes come from age or rough handling, so inspect them as you go.
Overpacking the links is also a trouble spot. Folks often think tighter is better, but stuffed too firm means hard twisting, split casings, and trouble during cooking or smoking. Leave enough give for the sausage to move a little.
Finally, do not ignore cleanup. A stuffer has food-contact parts, seals, and tubes that need a thorough wash and dry after every use. Good equipment will last, but only if it is cared for.
Manual or electric stuffer
For many home users, a manual stuffer is a solid choice. It gives good control, handles small to medium batches well, and usually has fewer moving parts to worry about. If you process deer, hogs, or farm-raised meat a few times a year, a dependable manual unit is often enough.
Electric stuffers earn their keep when batch size grows or production speed matters. Small butcher shops, delis, and busy home processors may prefer the faster output. The trade-off is cost and, sometimes, a little less feel at the point of fill. There is no one answer for everybody. The best pick depends on how often you stuff, how much you make, and whether you work alone.
A few practical tips for better sausage
Use a small test patty before stuffing so you can check seasoning. Once the casings are full, fixing under-seasoned sausage is a bigger chore than it needs to be.
Keep extra casings soaking while you work. If one length runs short or tears, you can reload quickly. Organize your pans so finished links are not piled too deep, especially if you plan to smoke them.
If you are making smoked sausage, give the links enough time to dry slightly before they go into the smoker. If you are making fresh sausage, refrigerate the links after stuffing so they firm up before cooking or freezing. A little patience at this stage often gives you a cleaner finished product.
At Heinsohn's Country Store, we have always believed in sturdy tools and plain good sense. That applies to sausage making as much as anything else. Learn the feel of cold meat, proper casing tension, and steady pressure, and your stuffer will do exactly what it was built to do.
A sausage stuffer is not just another gadget on the shelf. Used right, it helps you turn good meat, good seasoning, and honest work into a finished product you will be proud to serve at your own table.
Best Sausage Stuffer for Beginners
The first batch of homemade sausage usually teaches a hard lesson fast - stuffing with a grinder attachment can turn good meat into a smeared, frustrating mess. If you are trying to find the best sausage stuffer for beginners, the right answer is usually not the biggest machine or the cheapest one. It is the model that gives you steady control, easy cleanup, and enough capacity to make a real batch without wearing you out.
For most first-time sausage makers, a dedicated stuffer is worth it. A grinder is built to grind. A stuffer is built to push seasoned meat into casings with less heat, less smearing, and better texture. That difference matters whether you are making breakfast links for the family, venison sausage after deer season, or a few pounds of jalapeno cheddar for the smokehouse.
What makes the best sausage stuffer for beginners?
A beginner needs equipment that is forgiving. That means smooth operation, simple parts, and a size that matches the way most home batches are made. The best sausage stuffer for beginners is usually one that helps you learn good technique instead of fighting you every step of the way.
Start with control. Sausage stuffing goes better when you can keep a steady pace. If the plunger jerks, if the crank binds, or if the canister is awkward to reload, beginners tend to overstuff casings or leave air pockets. A good stuffer runs smoothly enough that you can focus on the casing in your hands, not on wrestling the machine.
Then look at cleanup. Sausage making already takes time between trimming, grinding, seasoning, mixing, and stuffing. If the cylinder, piston, and tubes are easy to remove and wash, you are a lot more likely to use the machine often. That matters for a beginner because repetition is what builds confidence.
Durability matters too. This is one category where flimsy gear shows its weakness early. Gears, seals, and cylinders take real pressure when meat is cold and properly mixed. A stuffer built with sturdy metal parts and dependable seals will hold up better and usually run smoother under load.
Vertical or horizontal sausage stuffer?
This is one of the first decisions a new buyer faces. Both styles can do the job, but they fit different workspaces and habits.
A vertical stuffer is often the easier choice for most home users. It takes up less counter length, usually offers good stability, and makes it easier to guide casing with one hand while operating the crank with the other. Many beginners find vertical models more comfortable, especially in the 5-pound to 15-pound range.
A horizontal stuffer can still be a good fit if counter height, storage shape, or personal preference points you that way. Some folks like the lower profile and the way it fits on a workbench. The trade-off is that it can take more room front to back, and some designs are a little less convenient when reloading.
If you are buying your first unit and want the safer bet, vertical is usually the practical starting point.
The right size for a first sausage stuffer
Bigger is not always better. A beginner who only wants to make 5 to 10 pounds at a time does not need to start with a large commercial machine. In fact, too much capacity can be inconvenient. A big canister is heavier to clean, bulkier to store, and harder to justify if you only stuff a few times a year.
For most households, a 5-pound stuffer is a strong starting size. It handles a meaningful batch without becoming oversized for the average kitchen or processing room. It is especially useful for small trial recipes, fresh sausage, and family-size batches.
If you process deer, hogs, or regular farm-raised meat in larger amounts, a 10-pound model may be the better long-term value. You will spend less time reloading, and that starts to matter once batches get bigger than a weekend breakfast run.
A 15-pound or larger machine makes sense when you already know sausage making is going to be a regular part of your setup. That could be a hunting household, a serious homestead kitchen, or a small food business. For a true beginner, though, it is often more machine than necessary.
Manual or electric?
For beginners, manual usually wins.
A hand-crank sausage stuffer gives you direct control over speed and pressure. That helps when you are learning how different casings feel and how tightly to fill each type. Manual models also tend to be simpler mechanically, easier to maintain, and more affordable for the capacity.
Electric stuffers have their place, especially for higher-volume production or for users who need to reduce physical effort. But they cost more, add motor components to maintain, and can be less forgiving if you are still learning pacing. Unless you are planning to stuff large batches often, a solid manual stuffer is usually the better first purchase.
Features that are worth paying for
Not every extra feature matters, but a few are worth having from the start.
A two-speed gearbox is one of them. The slower speed helps with controlled stuffing, while the faster speed makes it easier to raise the piston back up for reloads. That is a practical time-saver, not a gimmick.
A stable base matters more than many new buyers expect. When a machine shifts during use, stuffing becomes clumsy in a hurry. A stuffer with a strong frame and mounting options or non-slip support is easier to work with.
Multiple stuffing tubes are also important. Breakfast links, bratwurst, snack sticks, and larger sausages all call for different tube sizes. If a stuffer comes with a useful range of tubes, it gives a beginner room to try different products without hunting for extra parts right away.
Food-grade cylinder construction and dependable piston seals belong on the must-have list too. These are not flashy features, but they affect sanitation, pressure, and overall service life.
What beginners should avoid
The main mistake is buying on price alone. An ultra-cheap sausage stuffer may look fine in the box, but poor gears, weak clamps, and rough operation show up quickly once real meat goes in. That often leads to blowouts, wasted casing, and a tool that gets pushed to the back shelf.
Another common mistake is relying on a grinder attachment as a permanent solution. It may work for a very small test batch, but it is usually slower, rougher on the meat, and harder to manage. If homemade sausage is something you plan to do more than once or twice, a dedicated stuffer is the right tool for the job.
It is also smart to avoid buying oversized equipment just because it sounds more serious. Many beginners do better with a manageable machine they will actually use than with a large unit that feels like overkill every time it comes out.
How to choose the best sausage stuffer for beginners based on your setup
If you are a home cook making a few pounds of breakfast sausage and Italian links through the year, a manual 5-pound vertical stuffer is often the sweet spot. It stores fairly easily, handles common recipes well, and keeps the process simple.
If you are a hunter working through venison trim after the season, a 10-pound vertical model may be the better fit. It cuts down on reloads, handles larger batches more comfortably, and still remains practical for home use.
If your household butchers livestock, raises hogs, or makes sausage regularly for church events, family gatherings, or local sales, stepping up in capacity starts to make more sense. At that point, sturdier frames, larger cylinders, and faster operation pay off.
For many country families, the best value sits right in the middle - not a toy, not a full commercial floor unit, but a dependable hand-crank stuffer built for repeated real-world use.
A few beginner tips that matter as much as the machine
Even the best stuffer will not fix warm meat or poor prep. Keep your meat cold, mix until the bind develops, and load the canister firmly to reduce trapped air. That alone will improve results more than most new sausage makers expect.
Use the right tube for the casing. If the tube is too large or too small, the casing will fight you. Wet the casing properly, work at a steady pace, and do not worry if the first few links are not pretty. Good sausage comes from consistent handling, and that only comes with practice.
It also helps to buy from a place that understands processing equipment, replacement parts, and the kinds of questions real customers ask after the sale. A company like Heinsohn's Country Store has built its name around dependable tools for hardworking kitchens, smokehouses, and country households, and that kind of experience still matters.
A beginner does not need fancy equipment to make good sausage. What you need is a stuffer that is sturdy, easy to run, and sized for the batches you actually make. Get that part right, and the work becomes a whole lot more satisfying from the first crank forward.
A cast iron skillet can fry catfish over a camp stove, bake cornbread in a home oven, and handle hard daily use for years, but only if the surface is seasoned right. If you want to know how to season cast iron so it cooks clean, resists rust, and keeps getting better with use, the good news is the job is simple when you stick to the basics.
What seasoning really does
Seasoning is not just a coat of grease sitting on the pan. When a thin layer of oil is heated the right way, it bonds to the iron and forms a hard, dark finish. That finish helps protect the metal from moisture and gives you the kind of cooking surface cast iron is known for.
A lot of folks expect a brand-new skillet to turn perfectly slick after one round in the oven. Sometimes it does pretty well. More often, good seasoning is built over time. One proper base coat gets you started, and regular cooking adds to it.
That matters because cast iron is not like nonstick cookware from a department store. It rewards steady use, a little care, and the right tools for the job. Done right, it can last long enough to hand down.
How to season cast iron step by step
The best method is straightforward. Clean the iron, dry it completely, apply a very thin coat of oil, and bake it hot enough to set the finish.
If the pan is new, wash it with warm water and a little mild soap to remove dust, factory residue, or wax from packaging. If it is an older pan with sticky buildup or light rust, scrub it down first until you are working with a clean surface. Dry it right away with a towel, then place it over low heat or in a warm oven for a few minutes so every bit of moisture is gone.
Next comes the oil, and this is where many people go wrong. Use a small amount. Wipe the entire pan, inside and out, including the handle and the bottom. Then take a clean cloth or paper towel and wipe it again as if you are trying to remove all the oil you just put on. The iron should look barely coated, not wet or gummy.
Set the cookware upside down in an oven heated to around 450 to 500 degrees Fahrenheit. Put a sheet pan or foil on the lower rack to catch any drips. Bake it for one hour, then turn the oven off and let the cast iron cool inside.
That is one full round of seasoning. For a new pan or one that has been stripped down, two or three rounds can give you a stronger starting surface. After that, normal cooking does much of the work.
Choosing the right oil
You will hear strong opinions on this subject, and there is more than one workable answer. What matters most is using an oil in a very thin coat and heating it hot enough to set properly.
Common choices include canola oil, vegetable oil, grapeseed oil, and shortening. These are practical, easy to find, and dependable for most home cooks. Flaxseed oil gets talked about plenty, but it can produce a finish that chips on some pans if it is applied too heavily or built too fast. For everyday country cooking, a plain, reliable cooking oil is usually the better choice.
Animal fats can help maintain seasoning during cooking, especially bacon grease or lard, but they are not always ideal for the first oven seasoning if they are applied thick. They can turn sticky instead of hard. A lot depends on heat, thickness, and patience.
How to season cast iron without making it sticky
Sticky seasoning almost always means too much oil or not enough heat. That is the plain truth.
If your skillet feels tacky after seasoning, the oil layer was likely too thick to fully bond. Put the pan back in the oven at high heat for another round and see if it hardens. If it still stays sticky, scrub the surface firmly, dry it, and start over with a much lighter coat.
Another common mistake is pulling the pan too soon. Letting it cool slowly in the oven helps the finish settle. Rushing the process can leave uneven spots.
And do not expect a jet-black showroom finish overnight. Some pans bronze, brown, or darken in patches at first. That is normal. A hard, usable finish matters more than a picture-perfect one.
Cooking your way into better seasoning
Once the base coat is in place, the best thing you can do is use the pan. Cast iron improves through regular cooking, especially with foods that leave a little fat behind.
Cornbread, biscuits, fried potatoes, onions, burgers, and skillet-seared meats are all good early jobs for a freshly seasoned pan. These help build the surface without working against it too much. On the other hand, long tomato sauces, beans with lots of acid, or wine-heavy dishes can be rough on a thin new seasoning layer. Once the pan is well established, it can handle more, but early on it pays to be sensible.
This is where experience comes in. A hunting camp skillet used for bacon and eggs every weekend may season up fast. A pan used once a month and left damp in the sink will not. Cast iron likes steady, hardworking use.
Daily care after seasoning
Good seasoning is easier to keep than to rebuild. After cooking, clean the pan while it is still a little warm. Often hot water and a stiff brush or scraper are all you need. For stuck food, use coarse salt or a chainmail scrubber if you have one. A little mild soap is not the enemy if the pan needs it. The old rule against soap came from harsher lye soaps used years ago.
What you do need to avoid is soaking cast iron in water or leaving it wet. Dry it promptly and thoroughly. If you want extra protection, place it over low heat for a minute or two after washing, then wipe on the lightest film of oil before storing.
That last step is especially useful in humid climates, around outdoor kitchens, or in working farm and ranch households where cookware may sit between heavy uses.
When a cast iron pan needs to be reseasoned
Sometimes routine care is not enough. If you see rust, dull gray patches, flaking, or rough sticky areas, it may be time to reseason.
Light rust can usually be scrubbed away with steel wool or an abrasive pad, followed by washing, drying, and a fresh round of oven seasoning. Heavy flaking or thick carbon buildup may call for a more complete stripping before you begin again. That can sound like a big chore, but it is still worth doing on good cookware. A well-made cast iron pan has plenty of life left in it as long as the iron itself is sound.
This is one reason practical cooks and small food operations still trust cast iron. It is not disposable. With the right care, you can bring it back and put it back to work.
A few honest trade-offs
Cast iron is dependable, but it does ask something of the cook. It is heavy, it takes a little maintenance, and it does not forgive neglect like some modern coated pans do. If you leave it wet, it will rust. If you slop on oil, it will gum up.
On the other hand, few pieces of cookware can move from stovetop to oven to grill with the same kind of rugged service. Few hold heat the same way. Few are still doing honest work after decades in family kitchens, hunting camps, and small businesses.
For folks who value sturdy equipment over throwaway convenience, seasoning cast iron is not a burden. It is just part of owning good tools.
At Heinsohn's Country Store, we believe in the right tools for the job and in cookware built to earn its keep. Season your cast iron with a light hand, use it often, and treat it like a piece of working equipment, not a decoration. In time, that pan will tell you it was worth the effort every time supper hits the table.
A meat grinder usually tells you when something is wearing out. The motor strains harder than it used to. Meat smears instead of cutting clean. The auger slips, the plate clogs too fast, or the knife leaves a mushy grind that never used to happen. Meat grinder parts replacement is often the fix, and it is usually a lot cheaper than replacing the whole machine.
For folks who grind venison after season, put up sausage at home, or run steady batches through a small shop, worn parts are part of the work. A grinder is only as good as its cutting set, drive components, and fit between the moving pieces. When one part gets tired, the whole machine starts acting wrong. The good news is that most grinder trouble comes back to a handful of common parts.
When meat grinder parts replacement makes sense
A solid grinder is built to serve for years. That is especially true with heavier electric models, hand grinders, and commercial units that were made to be maintained instead of thrown away. If the housing and motor are still sound, replacing a few working parts is usually the sensible path.
The first thing to watch is grinding performance. If your grinder once handled trimmed beef or pork cleanly and now bogs down on the same batch, the problem may not be the motor at all. Dull knives, worn plates, a bent auger pin, or poor contact between the knife and plate can all slow output and heat the meat.
There is also the matter of safety and food quality. A grinder that crushes instead of cuts creates a poor texture and can warm the meat too fast. That matters whether you are making burger, chili meat, snack sticks, or sausage. Clean cuts give you a better finished product, and replacement parts help restore that proper action.
The parts that wear out first
Most meat grinder parts replacement jobs involve the same core components. The grinder knife and plate do the hardest work, and they tend to wear first. These parts must match correctly and sit flush to cut meat cleanly. If either surface is worn, rounded, or scored, performance falls off fast.
The auger is another trouble spot. It pushes meat forward to the knife and plate, and if the end is worn or damaged, the cutting set may no longer stay tight. That small amount of slack can turn a good grinder into a frustrating one. On some models, the auger bushing or washer also wears down and creates extra play.
Stuffing tubes, retaining rings, feed stompers, tray parts, gears, and motor couplers can also fail with use. Plastic drive gears and couplers are often designed to give way before the motor burns up, so replacing them can be a smart and expected repair, not a sign of a bad machine. On manual grinders, the handle, clamp, and screw assembly may need attention over time, especially if the unit has seen years of hard use.
Knife and plate fit matters more than most folks realize
A lot of people replace only the knife or only the plate and still wonder why the grinder runs poorly. The trouble is that these two parts wear together. If you put a new knife against an old plate, or the other way around, you may not get the flat contact needed for a clean cut.
That does not mean both always have to be replaced, but it often makes sense to inspect them as a pair. If the plate holes are worn shiny and rounded, and the knife edges have lost their crisp corners, replacing both together usually gives the best result.
How to identify the right replacement part
This is where many grinder owners get stuck. Meat grinder parts are not universal just because they look similar. Size, hub style, shaft shape, and brand-specific fit all matter. A #5, #8, #12, #22, or #32 grinder uses different parts, and even within those sizes, certain components can vary by manufacturer.
Start with the grinder size if you know it. That number is often tied to the plate diameter. Then look at the shape of the knife opening, the style of the plate notch, and the dimensions of the auger shaft. If you still have the old part, compare it carefully before ordering a replacement.
It also helps to check whether your grinder uses enterprise-style components or a proprietary set. Older and heavier-duty machines are often easier to keep running because replacement parts are more widely available. Some lighter household units use custom parts that must match the original exactly.
If a grinder has been in the family or shop for years and the paperwork is long gone, do not guess. Measure the plate, inspect the knife center opening, and look closely at how the retaining ring and auger fit together. A close match is not good enough on cutting parts.
Signs you need replacement instead of sharpening
Sharpening has its place, but it is not always the answer. A lightly worn knife and plate can often be freshened up if the surfaces are still true. But if the parts are warped, deeply grooved, cracked, or badly pitted from rust, replacement is the better route.
There is also a practical side to it. If a grinder is used often during hunting season, butchering days, or regular business production, new parts may save more time and trouble than repeated attempts to stretch worn ones a little farther. Reliable output matters when you have meat on the table and work to finish.
A bent knife should be replaced outright. The same goes for a plate with damaged holes or a retaining ring that no longer holds the assembly snug. Once fit is lost, grind quality follows.
Meat grinder parts replacement for electric and manual grinders
Electric grinders have more parts that can wear, but they also tend to reward maintenance. If the motor runs and the gearbox is sound, replacing the cutting head parts, drive gear, switch, or coupler can keep the machine useful for a long time. On heavier models, this is often well worth doing.
Manual grinders are simpler, but they still depend on proper fit. A loose clamp, worn handle connection, or tired knife and plate can make hand grinding more work than it should be. These old-style tools are often worth repairing because they were built from stout materials and still do the job right when fitted with good parts.
For customers who rely on practical equipment, this is the real value of replacement parts. A dependable grinder should not be treated like a disposable kitchen gadget. If the frame is good, the right parts can bring it back to honest work.
A few mistakes that cause repeat problems
One common mistake is over-tightening and assuming tighter always means better. The cutting set needs to be snug, but forcing parts together can wear threads, stress the retaining ring, and create drag that overheats the machine.
Another is poor cleaning and storage. Grinder parts put away damp will rust, and light rust on cutting surfaces can quickly turn into pitting. A thin coat of food-safe mineral oil on dry steel parts during storage can help protect them between uses.
Temperature matters too. Warm meat and warm grinder parts create smearing, and folks sometimes blame worn components when the setup is simply too hot. Cold meat, cold metal parts, and sharp cutting surfaces all work together. If the grinder still performs poorly under good conditions, then replacement becomes the next step.
Buying parts with the job in mind
Not every customer needs the same setup. A home processor doing a few deer each year may only need a fresh knife, plate, and stuffing tube. A small butcher shop may need backup plates in multiple grind sizes, extra knives, auger washers, and drive parts kept on hand to avoid downtime.
That is where a broad parts selection matters. Being able to match the grinder to the work, and the replacement part to the exact machine, saves time and cuts frustration. Heinsohn's Country Store has long served folks who still believe in the right tools for the job, and grinder parts are no exception.
If you are replacing parts, think past the one piece that failed. Ask what else is wearing alongside it, what kind of volume the grinder handles, and whether you need a spare on the shelf before the next processing day arrives. That kind of planning is not fancy, but it is how real work gets done.
A good grinder earns its keep one batch at a time, and with the right replacement parts, it can keep doing that for years to come.
A good sausage can forgive a lot - a coarse grind, a less-than-perfect casing job, even a little inconsistency in size. What it will not forgive is poor seasoning. This sausage seasoning guide is built for folks who want dependable results, whether you are making a five-pound batch in the home kitchen or running steady production for a small shop.
Seasoning is where sausage gets its character. It is also where many batches go wrong. Too much salt and the whole thing eats harsh. Too little and the meat tastes flat, no matter how good the pork or venison was to begin with. A heavy hand with sage, cayenne, fennel, or cure can push a recipe out of balance fast. The trick is not chasing fancy. It is understanding what each ingredient does and building flavor in a way that fits the kind of sausage you are making.
A sausage seasoning guide starts with the meat
Before you ever measure salt or pepper, look at your meat block. Pork shoulder with plenty of fat will carry seasoning differently than venison trimmed lean and blended with pork fat. Chicken and turkey need a little more help because they are mild. Beef can handle bolder spice. Wild game often benefits from enough seasoning to round out the stronger edge without burying the meat entirely.
That matters because seasoning is not just about taste on the tongue. Fat carries flavor. Lean meat reads salt and spice more sharply. If your batch is extra lean, a seasoning blend that works beautifully in pork may come across stronger than expected. If your batch is rich and fatty, the same blend may seem muted until it is cooked.
This is why experienced sausage makers do not season by guesswork. They build from percentages and test small patties before stuffing the full batch.
The core flavors every sausage batch needs
Most sausage seasonings rest on a few working parts. Salt is the foundation. It wakes up the meat, ties the other spices together, and helps with protein extraction when you mix properly. Black pepper is the next common layer. From there, your profile can move sweet, savory, smoky, hot, herbal, or old-fashioned breakfast style.
Sugar is often misunderstood. In sausage, a little sugar does not always make the product sweet. It can soften the edge of salt and pepper and help round out smoked varieties. Garlic and onion add body. Paprika brings color and gentle warmth. Red pepper and cayenne add heat, but they should be handled with care because they keep building as the batch sits.
Herbs such as sage, marjoram, thyme, and rosemary can define a sausage, but they are easy to overdo. Fennel seed is a classic in Italian sausage, yet too much makes the whole batch taste one-note. Nutmeg, allspice, and clove can work in small amounts in certain regional styles, though they can turn medicinal fast if the ratio gets away from you.
Start with percentages, not handfuls
If you want repeatable sausage, measure by weight. That is true in a farm kitchen, a deer camp, or a small processing room. Volume measurements can work for a family recipe, but they become unreliable when grind size, humidity, and spice density vary.
A good starting point for fresh sausage is salt at about 1.5 to 1.8 percent of the meat and fat weight. Black pepper often lands around 0.2 to 0.4 percent, depending on style. Sugar, if used, may sit around 0.3 to 1 percent. Garlic powder, onion powder, paprika, crushed red pepper, and herbs all vary by sausage type, but most are best approached with restraint on the first run.
For example, a 10-pound batch gives you enough room to test a profile without wasting product. Keep notes on every batch - meat type, fat level, grind plate, seasoning weights, cure if used, mixing time, and smoking or cooking method. Old-fashioned sausage making still benefits from good records. That is how you turn a decent batch into one you can repeat.
Match the seasoning to the sausage style
A practical sausage seasoning guide should not pretend one blend fits everything. Breakfast sausage wants a different hand than jalapeno cheddar, smoked German style, hot links, or venison summer sausage.As a matter of fact, a relatively new trend is the addition of hi-temp cheeses to sausages especially summer Sausage. Sort of breakes the monotony
Breakfast sausage is usually led by salt, black pepper, sage, and often a little red pepper. Some folks like brown sugar or maple notes, but that depends on the table you are feeding. Keep sage noticeable, not dominant. Too much and every bite tastes dusty.
Italian sausage usually leans on fennel, garlic, black pepper, and paprika, with heat adjusted by red pepper. Sweet Italian needs balance and enough fennel to be recognizable. Hot Italian can carry more chile, but the heat should still leave room for the pork.
Smoked sausage and hot links often need stronger seasoning because smoking changes how the flavor reads. Paprika, garlic, mustard powder, cayenne, and black pepper all have their place here. If you are using cure for a smoked product, measure carefully and follow the proper rate. Cure is not the place for improvising.
Venison sausage benefits from seasoning that supports the game flavor instead of fighting it. Garlic, pepper, mustard, coriander, and a little sugar often work well. If the batch is especially lean, make sure the fat ratio is right before you blame the seasoning. Dry sausage usually tastes under-seasoned because the mouthfeel is off.
Mix enough to bind, but do not beat the life out of it
Even a well-built seasoning blend can fail if the sausage is poorly mixed. Once your seasoning and any cure are added, the meat needs enough mixing to develop a tacky bind. That sticky texture tells you the proteins are extracting and the seasoning is dispersing through the batch.
Under-mixed sausage cooks up crumbly and uneven. One link tastes salty, the next bland. Over-mixing can smear the fat, especially if the meat gets too warm. That leads to poor texture and a greasy finish. Keep the meat cold, mix until tacky, and stop when the batch is uniform.
This is where the right tools for the job matter. A dependable grinder, a solid mixer setup, and a stuffer that does not fight you all help preserve texture and seasoning consistency. Good sausage is not just a recipe. It is process.
Always fry a test patty first
This step saves batches. Before stuffing casings or loading smoke sticks, cook a small patty in a skillet and taste it. That one quick test tells you if the salt is right, whether the sage is too forward, or if the heat needs a bump.
Taste it like a finished product, not like plain ground meat. If it is going in a bun with mustard and onions, remember those will affect the final flavor. If it is a breakfast sausage served beside eggs and biscuits, it needs enough seasoning to stand on its own.
Adjust in small steps. A little salt or cayenne can be added and remixed. Too much cure cannot be fixed. Too much clove, sage, or fennel is also hard to walk back. If a strong spice got away from you, your best option is often to blend the batch into a larger unseasoned batch.
Common seasoning mistakes and how to avoid them
The biggest mistake is seasoning by memory instead of by scale. The second is failing to account for the meat itself. Pork trimmings from one animal are not always the same as another. Wild game varies even more.
Another common problem is using old spices. Paprika that has sat in a warm cabinet for two years will not carry a smoked sausage. Black pepper fades. Garlic powder loses punch. If your sausage tastes dull, stale seasoning may be the reason.
Salt type matters too. A tablespoon of one salt does not always equal a tablespoon of another. That is another reason weight beats volume. And if you are using pre-made blends, read the label closely. Some mixes already contain salt, cure, sugar, or binders. If you add more without checking, you can throw the batch out of line.
Time also changes flavor. Fresh sausage often tastes different after resting overnight. Spices settle in, garlic rounds out, and heat can seem stronger the next day. Smoked sausage changes again after cooking and cooling. Judge the batch at the stage where you plan to serve it.
When to use a pre-blended seasoning
There is no shame in using a quality pre-blended seasoning. For many home processors, hunters, and small shops, it is the smartest way to get consistency. A good blend saves time, reduces measuring errors, and helps produce the same flavor from batch to batch. A lot of our customers will tweak the pre-blends to add a custom touch to it!
That said, not every blend fits every purpose. Some are built for a certain fat ratio or batch size. Some are salt-heavy. Some are mild enough for a broad market, which means you may want to bump the pepper or garlic for your own customers or family table.
At Heinsohn's Country Store, that practical side of sausage making still matters. Folks do not need guesswork. They need seasoning that fits the batch, tools that hold up, and results they can count on when the grinder starts turning.
If you want better sausage, start simple. Learn what salt, pepper, garlic, sage, fennel, and chile really do in the bowl. Keep your meat cold, weigh your spices, fry a test patty, and write down what worked. After a few batches, your seasoning stops being a gamble and starts becoming your signature.
When a busy shop falls behind on grind day, it usually comes down to one thing - equipment that cannot keep up. A commercial meat mixer grinder is built for that hard, repetitive work. If you are making sausage in volume, grinding trim day after day, or trying to keep labor moving in a small processing room, the right machine saves time, protects product texture, and takes strain off your crew.
What a commercial meat mixer grinder does better
A mixer grinder combines two jobs in one machine. It blends seasoning, fat, and lean evenly in the hopper, then feeds that mixed product straight into the grind. For a butcher shop, deer processor, meat market, deli, or restaurant doing fresh sausage, that can shave real time off production.
The biggest advantage is consistency. When the machine mixes and grinds in one workflow, you get a more even distribution of cure, spice, and fat throughout the batch. That matters for sausage quality, but it also matters for appearance in the case and for customer trust. A batch that looks right and cooks right is easier to sell again.
There is a labor benefit too. Running separate machines often means extra handling, more tubs, and more cleanup. A commercial unit can cut those steps down. That does not mean every operation needs one. If you only grind occasional small batches, a stand-alone grinder and separate mixer may still make better sense. But once volume climbs, combined equipment starts earning its keep.
How to size a commercial meat mixer grinder
Buying too small is the mistake most folks regret first. On paper, a smaller machine may seem cheaper, but if your crew has to run batch after batch just to finish the day, the savings disappear fast. Capacity should be matched to your busiest real-world workload, not your average slow week.
Think first about batch size. If you regularly mix 50, 75, or 100 pounds of sausage at a time, choose a machine that handles that volume without overfilling. An overpacked hopper does not mix as well, and it can slow feed into the head. When meat and seasoning are not moving freely, you get uneven distribution and extra wear on the machine.
Then look at hourly output. A shop processing wild game during peak season needs a different machine than a cafe making fresh bratwurst once a week. Commercial grinders are usually judged by head size, motor strength, and pounds per hour. Bigger numbers are useful, but only if your electrical service, floor space, and workflow can support them.
It also pays to think a year ahead. If business is growing, buy for the work you expect to handle soon, not just the work you handled last month. The right tools for the job should leave some room to grow.
Motor strength, drive system, and feed performance
Power matters, but raw horsepower is not the whole story. A good commercial meat mixer grinder needs enough strength to pull cold product cleanly without mashing it. Meat should be firm and properly chilled before grinding, and the machine should keep it moving without excessive smear.
That is where build quality shows up. A dependable gear-driven unit with solid internal parts often outperforms a flashy machine with big claims and lighter construction. In a busy kitchen or processing room, what matters is steady performance over time. Can it handle repeated batches? Can it run through trim, pork shoulder, or beef for burger without bogging down? Can it stand up to season after season of use?
Feed design makes a difference too. A well-built hopper, mixing paddle, and grind head should move product evenly toward the plate. Poor feed can lead to air pockets, inconsistent texture, and wasted time clearing jams. If you are producing sausage, especially with seasoning already in the batch, smooth feed helps protect the finished product.
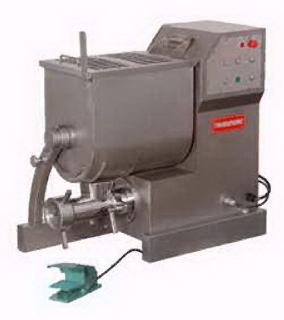
Meat Gear is only Mixer/Grinder available in 220 A.C. single Phase ,
.
Stainless steel construction and cleanup
Commercial meat equipment lives or dies by cleanup. If a machine is difficult to break down, hard to wash, or full of awkward corners, your staff will feel it every day. Stainless steel construction is more than a selling point. It helps with sanitation, durability, and long-term value.
Look closely at the parts that touch food. Hopper, paddles, pan, throat, head, knife, and plate should be built for regular washdown and repeated use. Removable components save time, especially at the end of a long shift. If replacement knives, plates, or other wear parts are easy to source, that matters just as much as the initial purchase.
There is a trade-off here. Heavier machines often clean up a little slower simply because the parts are larger and sturdier. But those same machines usually hold up better in real service. Most small processors and meat departments would rather spend a few more minutes cleaning a solid machine than lose production to weak equipment.
Choosing the right plate and grind setup
A commercial meat mixer grinder is only as useful as the grind it produces. Plate size and knife condition have a direct effect on texture. A coarse chili grind, a burger grind, and a smooth sausage grind all call for different setups.
For many shops, it makes sense to keep more than one plate on hand and plan your workflow around the finished product. If you are producing sausage with a finer texture, you may run one plate first and then finish with another. If you are making burger, you may want a coarser bite and less working of the meat. The machine should give you that flexibility without constant trouble.
Sharp knives matter just as much as motor size. A dull knife and worn plate create smear, heat, and poor texture. That can make a good machine seem weak when the real issue is maintenance. Keeping spare wear parts in the shop is plain common sense.
Who really needs a commercial meat mixer grinder
This type of machine makes the most sense for operations that process enough product to justify the footprint and cost. Small butcher shops, deer processors, farm stores with custom sausage, delis, smokehouses, and local restaurants are the usual fit. So are serious homesteads or ranch operations that process large seasonal batches.
For lighter users, a dedicated grinder may still be the better buy. If your work is mostly burger a few times a month, or occasional trim processing after hunting season, commercial mixer grinder capacity may be more machine than you need. Bigger is not always better if it means wasted space and underused equipment.
But if your team is hand-mixing tubs before feeding a separate grinder, and you are doing that week after week, there comes a point where combined equipment starts paying back in labor and consistency. That point arrives sooner than many owners expect.
What to watch before you buy
A machine can look right in a catalog and still be wrong for your room. Measure doorways, work tables, and floor space. Check electrical requirements before it arrives. Make sure your team can safely load, operate, and clean it.
Pay attention to service parts and support. Knives, plates, paddles, seals, and switches wear over time. A dependable supplier matters because downtime during busy season costs money. That is one reason many folks still prefer buying from a family business that understands meat processing instead of a general appliance seller. Heinsohn's Country Store has built its name on that kind of practical equipment for people who expect their tools to work.
It also helps to think about the full line, not just the machine. If you are grinding for sausage, you may also need tubs, scales, stuffers, seasoning, packaging tools, and sealing equipment. A mixer grinder works best as part of a complete processing setup.
Commercial meat mixer grinder value over time
The cheapest machine on day one is rarely the cheapest machine after a few seasons. Real value comes from uptime, clean grinding, easier labor, and parts availability. A dependable commercial unit can help a small operation produce more in less time while turning out a steadier product.
That said, there is no one-size-fits-all answer. The right commercial meat mixer grinder depends on your batch size, product mix, labor, and budget. A butcher making fresh sausage every day should buy differently than a seasonal game processor, and both should buy differently than a family putting away farm-raised pork once or twice a year.
Good equipment ought to earn its place on the floor. If a machine helps you work cleaner, faster, and with fewer headaches, it is doing what country folks have always asked of their tools - honest work, done right, for years to come.
eer Processing Equipment Guide for Hunters
The difference between a clean deer job and a long, aggravating night usually comes down to tools. A good deer processing equipment guide is not about buying every gadget on the market. It is about knowing which equipment earns its keep, which pieces can wait, and what will stand up to real use when a deer is on the table and the clock is moving.
For most hunters, the goal is simple. Get the animal cooled, broken down, trimmed, ground, wrapped, and into the freezer without waste. That takes a dependable setup, not guesswork. If you process one deer a year at home, your needs are different from a family that fills several tags or a small shop handling steady volume. The right tools for the job depend on how much meat you process, how often you do it, and whether you want basic freezer packs or a full sausage and burger operation.
Deer processing equipment guide: start with the essentials
Every deer processing setup begins with the same core categories. You need a solid cutting knife, a boning or trim knife, a sharpening method, a meat or butcher saw, a grinder, wrapping or sealing equipment, and a clean work surface. Skip quality in any one of those areas and the whole job slows down.
Knives do the close work. A field knife may get the hide opened, but once you are trimming silver skin, separating muscle groups, and cleaning up burger meat, you want blades that hold an edge and feel secure in the hand. A boning knife with a little flex helps around joints and along bone. A stiffer butcher knife handles larger cuts and trimming tasks better. Hunters who process often usually keep more than one knife on the table so they can switch tools instead of forcing one blade to do everything.
A good sharpener matters just as much as the knife itself. Even a quality blade becomes a burden when it starts dragging through tissue instead of slicing clean. If you only sharpen once a season, you are making the job harder than it needs to be. A simple sharpening system that is easy to use is often better than a complicated one that stays in the drawer.
The saw is another place where folks either save time or lose it. A butcher saw helps split through bone when needed and makes quartering more manageable. If you bone out most deer completely, your saw may not see constant use, but it is still a worthwhile piece of equipment to have on hand. There is a difference between making do and working efficiently.
Choosing a grinder that fits your workload
For many hunters, the grinder is the heart of the setup. Deer rarely goes from carcass to freezer without a fair amount of grinding, especially if you are making burger, chili meat, snack sticks, or sausage. The main question is not whether you need one. It is what size and power level make sense.
A small grinder can work for the hunter processing one deer at a time and doing modest batches. It takes longer, and you may need to stop to clear sinew or let the motor rest, but it gets the job done. A larger electric grinder is the better choice when you process several deer a season, add pork trim or fat, or plan to make sausage regularly. Bigger throat openings, stronger motors, and better feed rates make a real difference when you have coolers of meat waiting.
There is also the question of manual versus electric. Manual grinders still have their place for very light use or backup, but most deer processors are better served by electric models. Venison can be lean, stringy, and stubborn if it is not trimmed well. A dependable electric grinder turns a long job into a manageable one.
Plate size matters too. Coarse plates are useful for first grinds and chili blends, while finer plates help finish burger or sausage. If you want better texture, grind twice rather than forcing meat through a fine plate on the first pass. That extra step usually gives a cleaner result.
Sausage stuffers, mixers, and the tools for value-added processing
If your deer processing ends at burger and backstrap, you can stop at the grinder. If you want links, summer sausage, snack sticks, or seasoned bulk sausage, you need a little more equipment. This is where many hunters either build a proper setup or waste time trying to make one machine do too many jobs.
A dedicated sausage stuffer is worth it if you make sausage more than once or twice a year. Stuffing from a grinder works in a pinch, but it is slower, rougher on the meat, and harder to control. A vertical or horizontal stuffer gives steadier pressure and better fill, especially when working with natural or collagen casings.
Mixing is another step that deserves attention. Seasoning and added fat need to be worked evenly through the meat. Small batches can be mixed by hand, but larger batches are easier with a meat mixer. Consistency matters. Nobody wants one package bland and the next one over-seasoned.
Seasonings, cure, and casings are not equipment, but they are part of the overall setup. The best grinder in the world will not fix poor formulation. If you are making cured products, accuracy counts. A good scale is one of the most useful small tools in the room.
Packaging and storage equipment that protects your work
After all the cutting and grinding, poor packaging can ruin good meat. Freezer burn, leaking wraps, and sloppy labeling waste time and product. That is why packaging deserves a place in any deer processing equipment guide.
Basic freezer paper still works and has served country families well for generations. When wrapped tight and taped properly, it is dependable and economical. Vacuum sealing offers longer storage life and cleaner organization, especially for burger, steaks, and sausage. Chamber sealers and other heavy-duty sealing options make the most sense for larger volume users, but even a good household-grade vacuum sealer can be a strong step up from loose wrapping.
Whatever method you use, label everything with cut, weight or portion, and date. It sounds simple because it is simple, but it saves frustration later. A freezer full of white packages
Good processing equipment is not only about blades and motors. It is also about sanitation and handling. Meat needs to stay cold, surfaces need to clean up easily, and your workspace needs to support the weight and mess of the job. A sturdy processing table is worth more than a fancy tool you barely use. Wobbly folding tables and rough surfaces create problems fast. Stainless or other easy-clean surfaces help with sanitation and cleanup. Tubs, lug pans, and trays help separate trim, prime cuts, grind meat, and waste so you are not constantly shifting piles around. Temperature control is another part of quality. Meat grinds better when it is cold, trims cleaner when it is firm, and stores better when it gets packaged quickly. If your setup is in a warm garage or barn, work in smaller batches and return meat to ice or refrigeration often. There is no piece of equipment that can make up for warm, mishandled venison. A first-time home processor does not need to buy a full commercial lineup. Start with dependable basics - knives, sharpener, saw, grinder, scale, tubs, and packaging tools. Build from there as your volume grows. That approach is practical and keeps money in the right places. For families, hunting camps, and small meat businesses, heavier-duty equipment pays off quickly. More powerful grinders, larger stuffers, stronger sealers, and commercial-grade prep tools are not luxuries when the workload is steady. They reduce downtime, speed up production, and usually last longer under repeated use. This is where buying quality matters. Cheap motors, weak handles, thin housings, and hard-to-find parts may look fine on day one, but deer season has a way of exposing poor equipment. Reliable tools are part of old-fashioned country sense. Buy once where it counts. If you are prioritizing, spend first on your knife setup, grinder, and packaging method. Those three areas affect nearly every pound of meat you process. A sturdy table and good tubs come next because they make the whole operation cleaner and more organized. A dedicated stuffer, mixer, and more specialized processing tools can come later if you move into sausage and larger batches. There is nothing wrong with growing your setup one season at a time. The key is choosing equipment that matches your real use instead of buying light-duty gear you will outgrow before next season. Heinsohn's Country Store has long served folks who want dependable tools, replacement parts, and practical equipment built for honest work. That kind of catalog matters when you are putting together a deer processing setup that needs to serve season after season. The best deer processing room is not the fanciest one. It is the one with sharp blades, cold meat, steady equipment, and tools you can trust when the work starts. Build it that way, and every deer you bring home will be easier to finish right.Clean work, safe temperatures, and tables that hold up
Deer processing equipment guide for home use vs. higher volume use
What to buy first and what can wait
What Size Meat Grinder Do You Need?
If you have ever stood over a pile of venison trim, pork shoulder, or beef for sausage and asked yourself what size meat grinder makes sense, you are asking the right question. Too small, and the job turns into an all-day chore. Too big, and you spend more money, space, and power than the work really calls for. The right grinder size comes down to how much meat you process, how often you do it, and whether you are grinding for the supper table or for steady production.
What size meat grinder really means
A lot of folks assume grinder size is only about the motor. Motor strength matters, but when people talk about grinder size, they are usually talking about the head size - numbers like #5, #8, #12, #22, and #32. That number refers to the size of the grinder head, plate, and feeding components. As the number goes up, the throat opening gets larger, the grinding plate gets bigger, and the machine can move more meat in less time.
That is why a #8 grinder and a #22 grinder do not belong in the same class, even if both are electric. The larger unit is built to accept bigger chunks, keep up with heavier batches, and stand up to longer run times. For a family that grinds a few deer a season, a smaller machine may be just right. For a ranch family, hunter group, or small processor, a larger grinder often saves labor, time, and wear on the machine.
What size meat grinder is best for home use?
For most home kitchens, a #8 or #12 grinder is the practical middle ground. These sizes handle burger, chili meat, sausage trim, and game processing without taking over the whole workbench. If you grind a few pounds at a time for weekly cooking, a #5 or #8 can do the work. If you put away larger amounts of meat at one time, a #12 gives you more room to work and less waiting between batches.
A #8 grinder usually fits the home cook who wants fresh ground chuck, burger blends, or small sausage runs without much fuss. It is easier to store, easier to move, and often more affordable. The trade-off is pace. If you are feeding a grinder steadily with several tubs of meat, that smaller throat and plate can slow things down.
A #12 is often where serious home processing starts. It still fits a home setup, but it has enough capacity to handle deer season, hog processing, or regular sausage making without feeling underbuilt. For many country households, this is the size that covers the widest range of jobs without stepping into full commercial territory.
When to move up to a larger grinder
A #22 or #32 grinder is usually the right call when volume is part of the routine, not the exception. If you are grinding multiple deer every season, processing livestock at home, helping neighbors with butchering days, or running a small food business, a larger grinder pays for itself in saved time and steadier performance.
The big advantage is not only speed. Larger grinders generally feed better, handle colder meat more efficiently, and are less likely to bog down when the mix includes tougher trim. They are also better suited for repeat use. That matters if you are making sausage in quantity or running several batches back to back.
Of course, bigger is not always better. A #22 or #32 takes more counter or table space, weighs more, and costs more. It also makes less sense if your average batch is five or ten pounds. Buying extra machine for work you rarely do is like hitching a stock trailer to haul a sack of feed.
Think in batch size, not just grinder number
One of the best ways to answer what size meat grinder you need is to think about your typical batch.
If you usually grind 5 to 15 pounds at a time, a smaller grinder is often enough. If your normal work is 15 to 40 pounds, a #12 starts looking like the safer choice. Once you are regularly grinding 40 pounds and up, especially during hunting season or livestock processing, a #22 or larger becomes much easier to justify.
This is where many buyers get tripped up. They shop for the one big day a year or they shop for the smallest job on the calendar. The smarter move is to choose for the work you do most often, then give yourself a little room to grow. A grinder should not be running flat-out every single time you use it.
Motor power matters, but only with the right build
Horsepower gets attention because it is easy to compare, but it does not tell the whole story. A grinder with a strong motor and a cramped head size still has limits. A well-built grinder balances motor strength, gear design, feed capacity, and construction.
For smaller home use, lower horsepower may be perfectly fine if the machine is built well and you are grinding trimmed, chilled meat in moderate quantities. For heavier use, more horsepower helps the grinder keep its pace and reduces strain during long sessions. If you are grinding sinewy game meat, mixing in fat, or doing coarse and fine passes for sausage, that reserve power becomes more important.
The key is to match the motor to the workload. Underpowered machines often smear fat instead of cutting cleanly, heat up during use, and wear out faster. That is one reason experienced processors tend to buy sturdy equipment once rather than replace a light-duty grinder every few seasons.
Plate size, throat size, and workflow
The grinder plate is not just a technical detail. A larger plate and throat opening let you feed bigger pieces of meat with less prep. That cuts down on trimming and chunking time before the grinding even starts. If you process a lot of game or butcher your own livestock, this matters more than many first-time buyers realize.
Smaller grinders ask for smaller meat pieces and a slower hand at the feed tray. That can be perfectly acceptable for kitchen use, but on a serious processing day, it adds up. A larger grinder improves workflow from start to finish, especially when one person is feeding, one is packing, and the meat needs to keep moving cold.
This is also why grinder size should match the rest of your setup. If you have a good sausage stuffer, enough table space, tubs for meat, and a sealing system ready to go, a faster grinder can keep the whole line moving. If the rest of your process is small-scale, a large grinder may not offer as much benefit.
Manual or electric?
If you only grind once in a while and your batches stay small, a manual grinder still has its place. It is simple, dependable, and useful where power is limited. It also suits folks who want a basic tool for occasional kitchen work.
But if you are grinding game, making sausage regularly, or handling anything beyond modest amounts, electric is usually the better fit. It saves labor, keeps production moving, and makes it easier to get consistent results. Most people asking what size meat grinder they need are really trying to decide how much machine they need for real work. In that case, electric usually wins.
A practical way to choose the right size
For occasional household grinding, look hard at a #8. For most families, hunters, and homesteaders, a #12 is often the sweet spot. For bigger seasonal batches, frequent sausage making, or small business use, a #22 is a strong working choice. If you are doing serious volume on a regular basis, a #32 belongs in the conversation.
That does not mean everybody should buy the biggest grinder they can afford. It means buying enough grinder to do the work without wasting time, money, or effort. The right tools for the job are the ones that fit your hands, your table, and your workload.
A family business like Heinsohns Country Store has long known what country folks learn early - equipment ought to earn its keep. When you choose a meat grinder by real batch size, real use, and real durability, you are much more likely to end up with a machine that serves you well for years.
If you are between sizes, lean toward the grinder that gives you a little breathing room. Most people rarely regret buying a machine that handles the job with ease.
Deer Processing Setup Example for Home Use
A good deer processing setup example starts before the deer ever reaches the skinning pole. If your table is too small, your grinder bogs down, or your packaging station is across the room, you will feel every bit of it before the job is done. For hunters and country families who process their own venison, the best setup is not the fanciest one. It is the one that stays clean, works in the right order, and holds up season after season.
What a good deer processing setup example should do
A home venison setup needs to handle four jobs well: hanging and skinning, trimming and boning, grinding and mixing, and wrapping for the freezer. If one of those stations is weak, the whole process slows down. That is why the right tools for the job matter more than loading a room with equipment you may not use.
For one or two deer a season, a modest setup can do fine. For a hunting camp, large family, or anyone filling a freezer every year, heavier-duty equipment starts making more sense. The trade-off is simple. Smaller tools cost less up front and take less space, but they can turn a long processing day into a longer one. Commercial-style gear costs more, but it pays back in speed, cleaner cuts, and less strain on the operator.
Deer processing setup example by work zone
The easiest way to plan a setup is to think in zones. Venison should move one direction through the space, from dirty work to clean work. That helps with sanitation and saves steps.
1. Hanging and skinning area
This is your first station, and it needs room more than anything else. A gambrel and hoist, sturdy overhead support, good lighting, and a hose-ready floor make this area work. If you process in a barn, shop, or covered shed, concrete is a real advantage because it cleans easier than dirt or gravel.
A skinning knife, boning knife, sharpening steel, and a hand meat saw are basic here. Some folks like a reciprocating saw for heavier cutting, but a butcher saw gives you more control and keeps the setup simpler. Keep a barrel or tub nearby for hide, lower legs, and trim you are not saving.
Temperature matters. Cool weather helps, but if daytime heat is still hanging on, move from skinning to quartering quickly. Venison forgives less than beef when it gets warm. If your area is not climate controlled, your setup needs to make speed possible.
2. Cutting and trimming table
Once the deer is skinned and quartered, the next station should be a solid cutting table. Stainless steel is hard to beat because it cleans up well and stands up to hard use. A table that wobbles, stains, or holds moisture causes more trouble than people expect.
This is where sharp knives earn their keep. A curved boning knife, a straight butcher knife, cutting board, meat lug or tub, and a few trays for sorted cuts make the work faster. One tub for steaks and roasts, another for grind meat, and another for scraps keeps the workflow clean.
If you are serious about quality, trim silver skin, bloodshot tissue, and excess tallow as you go. That takes more time in the moment, but it improves flavor in the freezer and gives your grinder less junk to fight through. A lot of deer processing complaints come down to rushed trimming, not bad meat.
3. Grinding and mixing station
For many home hunters, this is where a weak setup shows itself. A light-duty grinder may handle burger from one deer, but if you process several deer or add pork fat for sausage, you need more motor, larger grinding plates, and dependable feed speed.
A practical grinding station includes an electric meat grinder, grinder plates and knives in the sizes you actually use, meat tubs, and a mixer if you make seasoned ground venison or sausage. Some folks mix by hand, and that still works, but once your batch size grows, a mixer saves time and gives more even seasoning.
Keep the meat cold before it hits the grinder. That means trimmed chunks in tubs over ice or in a refrigerator until you are ready. Warm venison smears instead of grinding clean. The result is poor texture, slower grinding, and more mess in the head of the machine.
If your setup includes sausage making, this is also where a dedicated sausage stuffer belongs. A grinder can force meat into casings, but it is not the best tool for that job. A proper stuffer gives better control and better finished links.
4. Packaging and freezer station
The last step deserves as much planning as the first. Wrapping at a cramped corner of the table after hours of cutting is how meat gets mislabeled, poorly sealed, or left out too long.
Set up a clean station with freezer paper or vacuum sealing equipment, tape or bags, a scale if you package in measured portions, and a marker for labeling. Vacuum sealing is a strong choice if you keep venison for extended freezer storage. Freezer paper still works well for many families, especially if the meat will be eaten within the year, but it takes care and practice to do it right.
Label every package with the cut and date. It sounds simple because it is simple, but it saves a lot of guesswork later.
A realistic home layout that works
Here is a plain, workable deer processing setup example for a garage, shop, or barn room. Put the hanging area near the entry so the deer comes in and gets skinned without crossing your clean prep space. A few feet away, place your trimming table under bright lights with tubs beneath or beside it. Next to that, set the grinder and mixer station, close enough that trim can move straight from table to grinder. Finish with a packaging table nearest the refrigerator or freezer.
That straight-line layout matters. It reduces carrying, keeps dirty hides and hair away from finished meat, and makes cleanup easier when the day is done. If your room is small, fold-down tables and mobile equipment carts can help, but the order of work should still stay the same.
Equipment choices depend on volume
Not every hunter needs a commercial room full of gear. That said, buying too small is a common mistake. If you process one deer every other year, a compact grinder, basic knives, and a wrapping setup may be all you need. If your household processes multiple deer, makes burger in quantity, or turns venison into summer sausage, snack sticks, or links, stepping up to heavier equipment is usually money well spent.
The same goes for replacement parts and accessories. Extra grinder plates, knives, stuffing tubes, and sharpening supplies are not glamorous purchases, but they keep a setup working when the season is on. Heinsohn's Country Store earns its keep by carrying the hard-to-find pieces that keep country kitchens and processing rooms running.
Cleanliness is part of the setup, not an afterthought
A solid processing area should be easy to wash down and easy to sanitize between stages. Keep clean towels, food-safe sanitizer, aprons, gloves if you use them, and a wash sink or water source close by. Trash containers should be within reach but not in the way.
Think about floors and drains too. A setup can have fine equipment and still be frustrating if blood and rinse water pool around your feet. Even small improvements, like floor mats and a better drain path, make a long day more manageable.
Good lighting is another detail people often short themselves on. Venison trimming needs clear sight, especially around silver skin, connective tissue, and damaged meat. Dim corners lead to waste or missed trim.
Common mistakes in a deer processing setup example
The biggest mistake is trying to do too much on one surface. Skinning tools, clean cuts, grinding tubs, and packaging supplies should not all fight for the same table. The second mistake is underpowered equipment. The third is poor temperature control.
Another trouble spot is workflow. If you carry meat back and forth across the room, cross paths with dirty tools, or stop repeatedly to wash a single tub or knife, the setup is costing you time. Good processing is steady work. The room should help that pace, not interrupt it.
For folks building out a better home station, Heinsohn's Country Store has long served hunters, home processors, and working country families who want dependable equipment instead of throwaway gear.
Start simple, then build where it counts
If you are improving your setup one piece at a time, start with the tools that affect the job most: a stable table, sharp knives, a grinder sized for your workload, and a packaging method you trust. After that, add the upgrades that match how you actually process deer, not how you imagine doing it once a year.
The best deer room is not the one with the most equipment. It is the one that lets you handle good venison cleanly, safely, and without wasting meat. Build it around honest work, keep it organized, and it will serve your family for many seasons to come.
Electric Meat Grinder Review for Real Work
A grinder tells on itself the first time you put real work through it. A few pounds of trimmed chuck is easy. A batch of venison with silver skin, pork for sausage, or several deer during season is where an electric meat grinder review needs to get honest. Folks shopping for a grinder do not need fancy claims. They need to know whether a machine will keep up, clean up, and hold up.
For country kitchens, hunting camps, homesteads, and small meat businesses, the right grinder is less about bells and whistles and more about steady performance. Motor strength matters, but so do throat size, head construction, plate fit, feed rate, and whether replacement parts are easy to get later. A cheap grinder can look fine on paper and still leave you fighting smearing, clogging, or overheating when the work starts.
What matters most in an electric meat grinder review
The first question is not brand name. It is workload. If you grind five to ten pounds a few times a year for burger or chili meat, a lighter household unit may be enough. If you process deer, hogs, poultry, and sausage on a regular basis, you need a machine built for repeated batches, not a countertop appliance trying to act like shop equipment.
Power is where many buyers get sidetracked. Advertised wattage can sound impressive, but grinder performance depends on more than a number on the box. A well-built unit with a solid gear drive, good knife and plate contact, and a properly sized head often outworks a machine that boasts high power but uses lighter components. When meat is cold and trimmed right, a good grinder should pull product through with little forcing. If you have to lean hard on the stomper, something is off.
Grinder size matters just as much. A larger head and throat let you feed bigger strips and keep work moving. Smaller units require more prep and more patience. That may be fine for a home cook making one batch of burger. It gets old in a hurry when you have tubs of venison waiting. For many homes, a mid-size grinder is the sweet spot because it gives enough capacity without taking over the whole workspace.
Matching grinder size to the job
A small electric grinder works best for light kitchen use. That means occasional burgers, meatloaf, or a modest sausage batch. These machines are easier to store and cost less up front, but they usually have limits. They can heat up faster, require more trimming, and take longer on tougher cuts.
Mid-size grinders fit the needs of a lot of rural families. If you hunt every year, raise a few animals, or split processing duties with family, this class usually makes the most sense. You get better throughput, stronger components, and less strain during longer sessions. For many folks, this is where value and usefulness meet.
Large and commercial-grade grinders are for heavy work. If you process several animals each season, make sausage to sell, or run a deli, butcher shop, or restaurant, this is money better spent than buying too small and replacing it later. Bigger units cost more and take more room, but they save time and frustration when volume is not optional.
Build quality separates a tool from a headache
When reading any electric meat grinder review, pay close attention to construction. Stainless steel components generally hold up well, clean well, and stand up better to repeated use. Aluminum parts can be serviceable in lighter applications, but they often show wear sooner. Plastic housings and trays are not always a deal breaker on a small household model, yet they rarely inspire confidence when the batches get serious.
The knife and plate system deserves more attention than it gets. Sharp, properly fitted cutting parts make the difference between clean grinding and mashed meat. If the knife is dull or the plate fit is poor, the grinder can smear fat instead of cutting it. That hurts texture, especially for sausage. It also slows the whole job down because soft, smeared meat tends to clog.
A good feed tray, stable base, and controls you can operate with wet or cold hands are small details that matter on processing day. So is disassembly. A grinder that is awkward to break down and wash becomes less useful over time, no matter how strong the motor is.
Performance in real-world grinding
The best test is simple. Can the grinder handle cold meat consistently without bogging down? Meat should be well chilled, not half frozen solid, and trimmed of gristle, glands, and oversized connective tissue. Even then, a good grinder should not labor through ordinary work. Venison mixed with pork fat, beef for burger, chicken for sausage, and pork shoulder for fresh links are all common jobs. A dependable machine should manage them without constant stoppage.
Reverse function can help when something binds, but it should be seen as a backup, not a selling point that excuses weak performance. If a grinder needs frequent reversing, it may be undersized for the work or the meat may not be prepped well. Either way, the answer is not just pushing harder.
Noise is another trade-off. Stronger grinders are often louder, especially under load. Most experienced users will put up with noise if the machine grinds clean and steady. Quiet is nice, but throughput and consistency matter more in a working kitchen or game-processing setup.
Cleaning, maintenance, and parts support
A grinder is not a one-day purchase if it is chosen right. That is why serviceability matters. Knives dull. Plates wear. Stuffing tubes go missing. Switches and seals eventually need attention on hard-used machines. Equipment with available replacement parts has a much longer useful life than a bargain unit you cannot repair.
Hand washing is usually the safe route for grinding parts, especially cutting surfaces. Dry everything thoroughly and oil steel parts lightly when needed to prevent rust. Many grinding problems blamed on the motor are really maintenance problems. A dull knife, warped plate, or poor reassembly can make a solid machine act weak.
This is where buying from a specialized country retailer still matters. Stores that understand meat processing equipment tend to stock the accessories, replacement parts, and related tools that keep your setup working. Heinsohn's Country Store has long served customers who need more than a one-box appliance and want the right tools for the job.
Who should buy what
For the home cook who grinds a few times each year, a smaller electric grinder can be a practical choice if expectations stay realistic. Keep batches modest, meat cold, and cutting parts sharp, and it will do honest work.
For hunters, homesteaders, and farm families, stepping up to a sturdier mid-size or heavy-duty unit usually pays off. You save time during season, get a cleaner grind, and avoid wearing out a light machine with work it was never built to handle.
For small commercial users, the decision should be made around daily volume, sanitation needs, and downtime risk. A lower purchase price means very little if the grinder slows production or cannot be serviced quickly. In that setting, dependability is part of the cost calculation.
Common mistakes buyers make
The biggest mistake is buying too small. Many people shop for the grinder they hope they need, not the one their workload actually demands. The second mistake is focusing on motor claims while ignoring head size, construction, and cutting quality. The third is overlooking parts availability. Every hardworking tool needs support sooner or later.
Another common problem is expecting the grinder to overcome poor prep. Even the best machine works better when meat is trimmed, chilled, and fed in manageable strips. Good equipment helps, but sound processing habits still matter.
Final take on an electric meat grinder review
A worthwhile electric meat grinder review should come down to one plain question: will this machine serve your household or business for the kind of work you really do? If you need occasional convenience, a smaller unit may be enough. If you process game, make sausage, or grind meat in volume, buy for durability, capacity, and parts support first.
The best grinder is not the one with the flashiest numbers. It is the one that keeps turning through cold meat, cleans up without a fight, and is ready when the next batch is on the table. Buy once with honest expectations, and you will be a lot happier when the work is waiting.
Vacuum Packing Food Preservation Disadvantages
A lot of folks buy a vacuum sealer expecting one thing - seal it up tight and the food will stay good for a long, long time. That is partly true. But vacuum packing food preservation disadvantages are real, and they matter most when you are putting up meat, fish, garden produce, and cooked leftovers for your family or your business. A vacuum bag is a useful tool, not a free pass against spoilage.
That matters in country kitchens, deer camps, butcher rooms, and small food operations where people are handling real volume. If you process your own game, stock a freezer with beef, or put up fish after a good weekend on the water, you need to know what vacuum sealing can do and what it cannot do.
What vacuum packing does well - and what it does not
Vacuum packing removes a good portion of the air around food. That helps slow oxidation, reduces freezer burn, and gives you a tighter, cleaner package than plain butcher paper or standard storage bags. For many jobs, that is a big step up.
But vacuum sealing does not sterilize food. It does not kill bacteria, stop enzyme activity completely, or make unsafe food safe again. If the food went into the bag warm, wet, dirty, or already past its prime, the bag will not fix that. In some cases, a poor sealing routine can actually create better conditions for certain dangerous bacteria.
That is where people get into trouble. They mistake less air for total protection.
The biggest vacuum packing food preservation disadvantages
The main drawback is simple - vacuum packing extends storage life, but it does not replace refrigeration, freezing, proper cooking, or clean handling. Once you understand that, the rest of the trade-offs make more sense.
Low-oxygen conditions can favor dangerous bacteria
One of the most serious concerns is botulism risk. Clostridium botulinum grows in low-oxygen environments. A vacuum-sealed bag is exactly that kind of environment. Now, that does not mean every sealed bag is dangerous. It means the food still has to be handled at the right temperature and for the right amount of time.
This is especially important with fish, smoked products, garlic in oil mixtures, and moist cooked foods. If those foods are vacuum sealed and then held at unsafe temperatures, the lack of oxygen can work against you. A tight bag looks clean and secure, but appearance is not the same as safety.
Refrigeration still matters more than the bag
Some people assume vacuum packing buys them enough time to get careless with cold storage. It does not. Refrigerated foods still need proper refrigeration. Frozen foods still need to stay frozen.
If power goes out, if a cooler runs warm, or if sealed packages sit too long in a truck or garage, spoilage and safety problems can still develop. Vacuum packing gives you an advantage, but temperature control is still doing the heavy lifting.
Moisture can create problems inside the bag
Vacuum sealers and wet food do not always get along. Juices from fresh meat, marinade, or blanched vegetables can interfere with the seal. A weak seal may hold for a day or two, then fail without much warning.
Moisture also changes the storage environment. Even when the seal holds, trapped liquid can affect texture, encourage off odors, and make the package harder to stack and inspect. For folks processing a lot of venison, sausage, or fish, this is one of the most common practical headaches.
Texture can suffer on some foods
Vacuum packing is not gentle on everything. Soft berries, ripe tomatoes, delicate baked goods, and some cheeses can get crushed or compacted. Even when they stay safe, they may not come out looking or feeling the way you wanted.
Meat generally does better, but there are trade-offs there too. Tight packaging can draw out purge - that red liquid many people mistake for blood - and some cuts can develop a slightly changed surface texture after long storage. It is not always a deal breaker, but it is worth knowing before you package a whole batch.
Some foods still have a shorter shelf life than people expect
Another of the common vacuum packing food preservation disadvantages is false confidence about shelf life. Yes, vacuum sealing can help food last longer than loose wrapping. But "longer" does not mean indefinite.
Fresh meats, cooked meals, produce, and smoked foods all have their own limits. The bag slows down certain kinds of spoilage, but fats can still go rancid, flavors can fade, and quality can still drop over time. If you have ever opened an old freezer package that looked fine but tasted tired, you have seen this firsthand.
Vacuum sealing is not the same as canning or curing
This is where a lot of confusion starts. Vacuum packing is a packaging method. Canning is a heat-processing preservation method. Curing uses salt, nitrite, drying, or smoke as part of preservation. Freezing uses low temperature to stop most bacterial growth.
Those are not interchangeable.
A vacuum sealer can support a good preservation plan, but it is not a replacement for the old proven methods. If you are putting up sausage, jerky, fish, or garden goods, the right process still depends on the food itself. Folks who grew up around home processing usually understand that the package is only one part of the job.
Equipment quality makes a difference
Not every vacuum sealer performs the same, and this is one disadvantage people do not think about until they have wasted food. Light-duty units can struggle with repeated use, wet foods, wider bags, or thick cuts of meat. Weak vacuum pressure or inconsistent heat seals lead to leaks, ice crystals, and spoiled product.
That is not really a fault of vacuum packing as a method. It is a fault of using the wrong tool for the job. A family putting up a few leftovers each week may get by with a basic machine. A hunter sealing a season's worth of game or a small processor handling regular volume needs equipment that can stand up to real work.
Cost is higher than some people plan for
Vacuum packing also has an ongoing cost. Bags are not free, and better bags cost more. If you are sealing in quantity, those supplies add up. There is also the machine itself, replacement parts, and maintenance over time.
For many households, the savings from reduced freezer burn and less waste make it worthwhile. But if somebody is buying a sealer because they think it is the cheapest preservation method available, they may be disappointed. In some situations, butcher paper, freezer wrap, or rigid freezer containers still make good practical sense.
It can hide spoilage signs
Air exposure often gives you warning signs. Mold becomes visible. Odors escape. Surface changes are easier to spot. In a vacuum-sealed bag, food can stay looking neat even as quality drops or safety problems develop.
That does not make the bag dangerous by itself. It just means the package can give a false sense of confidence. If you do not label dates, rotate stock, and pay attention to storage conditions, a tidy-looking package can fool you.
When vacuum packing makes good sense
With all that said, vacuum sealing is still a hard-working tool when used properly. It is excellent for freezer storage of well-chilled meats, portioning bulk products, keeping sausage seasonings or dry goods protected, and organizing a cleaner storage system. It is especially useful when you want consistent portions and less freezer burn.
For many country families and small shops, the best approach is balanced. Chill or freeze food promptly. Use clean handling. Seal with the right bags and the right machine. Label everything. Then store it under the proper conditions. That is how vacuum packing earns its keep.
How to avoid the common disadvantages
Most problems come from expecting too much from the bag or cutting corners before sealing. Cool food before packaging, but do not leave it sitting out too long. Freeze very wet foods slightly before sealing if needed. Use bags made for the machine. Check every seal. Date every package. Keep refrigerators cold and freezers steady.
If you are sealing fish, smoked items, or cooked foods for storage, follow food safety guidance closely. If you are processing a lot of meat, it often pays to use heavier-duty equipment built for repeated use. That is usually cheaper than losing a freezer full of hard-earned food.
Folks who live close to the land tend to understand a simple truth - good preservation starts long before the bag closes. Vacuum sealing is a strong helper, but it still works best alongside clean handling, cold storage, and the right tools for the job. At Heinsohns Country Store, that old lesson still holds up: dependable results come from doing the work right the first time.
Does Vacuum Sealing Preserve Food?
A freezer full of venison, a batch of sausage from the weekend, garden vegetables you do not want to waste - that is where the real question comes up: does vacuum sealing preserve food well enough to be worth the trouble? In most cases, yes. Vacuum sealing can extend storage life, protect quality, and cut down on freezer burn. But it is not magic, and it does not replace proper temperature control, clean handling, or common sense.
For folks who process their own meat, stock up in bulk, or put food away for the season, vacuum sealing is one of the handiest tools in the kitchen or shop. The trick is knowing what it actually does, what it does not do, and how to use the right machine for the job.
Does vacuum sealing preserve food by itself?
Vacuum sealing preserves food by removing much of the air around it and sealing it in a tight bag. Less air means less oxygen, and less oxygen slows down several things that spoil food. It reduces oxidation, helps protect flavor and color, and limits freezer damage caused by exposure to air.
That matters most with meat, fish, cheese, coffee, nuts, and other foods that lose quality fast when they sit in ordinary packaging. A tight seal also keeps moisture where it belongs and helps food hold its shape better in frozen storage.
Still, vacuum sealing by itself does not make food shelf-stable. If a product needs refrigeration or freezing before sealing, it still needs refrigeration or freezing after sealing. Bacteria do not disappear just because the air is gone. Some kinds of bacteria can continue to grow in low-oxygen conditions if the food is held at unsafe temperatures.
So the honest answer is this: vacuum sealing is a preservation method, but it works best as part of a bigger system that includes cold storage, sanitation, and proper packaging.
What vacuum sealing does well
The biggest benefit is longer storage life with better quality. In the freezer, vacuum-sealed food usually lasts longer than food wrapped in paper, plastic containers, or zipper bags. It is better protected from frost, dry spots, and off flavors caused by air exposure.
For hunters and home butchers, this is especially useful. Ground venison, steaks, roasts, wild hog, duck breasts, sausage links, and smoked meats all benefit from a tight seal. If you put in the work to process it right, you want it to come out months later tasting like it should.
In the refrigerator, vacuum sealing can help some foods keep longer too, especially cured meats, smoked products, hard cheeses, and prepared portions. It also keeps things organized. Flat, sealed packages stack neatly, thaw more evenly, and take up less room in a cooler, fridge, or freezer.
Another advantage is portion control. You can package meal-size amounts instead of thawing a whole bulk pack every time. That saves money and avoids waste, especially for families that buy in quantity or process animals at home.
Where vacuum sealing falls short
Vacuum sealing is useful, but there are trade-offs. Soft foods can get crushed in external suction machines. Moist foods can interfere with the seal if liquid gets pulled into the sealing area. Sharp bones can poke tiny holes in bags and break the vacuum.
There is also the question of food safety. Vacuum sealing fresh fish, meat, and leftovers does not give you extra time to ignore the refrigerator. It simply helps protect the product from air and contamination. If something is already close to spoiling, sealing it up will not turn it back around.
Some foods also produce gases naturally over time. Certain vegetables, especially if not blanched before freezing, may not hold quality as well as expected. Fresh mushrooms, onions, and garlic can be tricky depending on storage conditions. If you are sealing produce for freezer storage, preparation matters almost as much as the seal.
Does vacuum sealing preserve food better in the freezer?
This is where vacuum sealing really earns its keep. Freezer burn happens when air reaches the food surface and moisture escapes. You end up with gray patches, dry texture, and stale flavor. Vacuum sealing greatly reduces that problem because the package fits close to the food.
For long-term frozen storage, that close fit is a major advantage over store wrap or thin household bags. Meat sealed properly and frozen promptly usually keeps better texture and flavor over time. The same goes for fish fillets, smoked sausage, bacon, and many prepared foods.
It still helps to start cold. Chill the food before sealing when possible, seal it dry, and freeze it quickly. A good package on warm food can trap steam and moisture, which is not ideal for either safety or seal strength.
If you are sealing bone-in cuts, use heavier bags or add a protective layer around the sharp end of the bone. A tiny puncture is enough to let air in and undo the whole job.
Chamber sealers vs suction sealers
Not all vacuum sealers work the same way, and that matters if you are packaging food regularly.
A standard external suction sealer works by pulling air out through the open end of the bag and then heat sealing it. These units are common for home use and work well for dry foods, boneless cuts, and everyday freezer packaging. They are a solid choice for families that seal food now and then.
A chamber sealer works differently. The entire bag sits inside a chamber, and the machine removes air from the chamber and the bag at the same time before sealing. That makes chamber machines better for liquids, marinades, soups, wet sausage mixes, and other moisture-heavy products. They also tend to produce more consistent seals in higher-volume use.
For a homesteader putting up chickens, a deer hunter packaging a season's worth of meat, or a small shop processing product every week, a chamber sealer is often the better long-term tool. It costs more up front, but it handles tougher jobs and repeated use with less fuss. That is one reason experienced processors often move in that direction.
Best foods to vacuum seal
Vacuum sealing works especially well for fresh meat, wild game, fish fillets, smoked sausage, bacon, jerky, cheese, nuts, coffee, dry beans, and many freezer-ready leftovers. Prepared meals such as chili, stew, taco meat, and barbecue also store well when cooled properly first.
Produce can be a little more case by case. Some vegetables should be blanched before freezing and sealing so they keep their color, texture, and quality. Berries and delicate fruit may need to be frozen on a tray first so they do not get mashed in the bag.
Dry goods are another overlooked use. Flour, rice, seasoning blends, dehydrated foods, and snack items can all benefit from reduced air exposure, especially in warm or humid country kitchens.
Safe use matters as much as the machine
The best sealer in the world cannot fix sloppy food handling. Start with clean surfaces, clean hands, and fresh food. Cool cooked items before sealing. Keep raw meat cold during packaging. Label every package with the contents and date.
If you are freezing, get the product into the freezer soon after sealing. If you are refrigerating, use the same food safety standards you would use without vacuum packaging. When thawing, do it in the refrigerator, under cold water, or as part of cooking - not out on the counter.
It also pays to inspect bags before and after storage. If a seal loosens, air gets in, or liquid leaks, use the product promptly if safe or discard it. A failed seal is not always obvious at first glance.
So, does vacuum sealing preserve food enough to justify buying one?
For most country kitchens, hunting camps, home butcher setups, and small food businesses, yes. Vacuum sealing helps preserve food by protecting it from air, moisture loss, and freezer damage. It stretches the value of what you raise, harvest, buy, or prepare. It keeps food in better condition and helps you waste less.
But the right answer depends on how you use food storage in real life. If you freeze a few leftovers now and then, a basic machine may be all you need. If you process meat in volume, package wet products, or want dependable results week after week, heavier-duty equipment makes better sense. That is where practical tools matter. A hardworking setup saves time, preserves quality, and stands up to real use.
At Heinsohn's Country Store, that kind of usefulness still matters. Good food is worth putting away right, and the right tools for the job pay for themselves over time.
If you want food to keep its quality longer, vacuum sealing is one of the plainest, most dependable ways to get there - so long as you pair it with good handling, good cold storage, and a little old-fashioned care.
How to Use Chamber Sealer the Right Way
A chamber sealer earns its keep fast when you are packing deer meat, freezing sausage, portioning fish, or putting up soups and sauces without making a mess. If you have been wondering how to use chamber sealer equipment without wasting bags or losing a good seal, the process is simpler than most folks expect once you understand what the machine is doing.
Unlike an edge sealer, a chamber machine removes air from the whole chamber, not just from the bag opening. That is why it handles liquids better, pulls a stronger and more even vacuum, and uses smooth chamber pouches instead of textured bags. For home processors, hunters, and small food businesses, that means cleaner packaging, longer freezer life, and a more dependable finish when you are putting up food in quantity.
Why a chamber sealer works differently
The biggest mistake new users make is treating a chamber sealer like a regular countertop vacuum sealer. With a chamber unit, the filled pouch sits inside the machine with the open edge laid across the seal bar. When the lid closes, the chamber pressure drops evenly inside and outside the bag at the same time. Then, right at the end of the cycle, the machine seals the bag before the chamber returns to normal pressure.
That design matters because liquids stay calmer during the vacuum stage than they do in an external sealer. You can package marinades, stew meat with juices, chili, fresh sausage, and even some brines far more cleanly. It is also why chamber bags usually cost less than textured bags, which adds up if you process a lot of meat through the year.
How to use chamber sealer equipment step by step
Start with the right size pouch. Leave enough headspace so the open end can rest flat and clean on the seal bar. In most cases, 2 to 3 inches above the food is enough. If the bag is packed too full, moisture or fat can get into the seal area and give you a weak seal.
Set the product in the pouch and keep the top edge dry. If you are packing fresh sausage, ground meat, steaks, chops, or fish fillets, arrange the product so it lays flat. A flatter package stores better in the freezer and stacks easier in boxes, coolers, or storage bins.
Place the pouch in the chamber with the open edge across the seal bar. Make sure the entire mouth of the bag is smooth, with no wrinkles. Wrinkles are one of the most common causes of seal failure. If your machine includes filler plates, use them when packing smaller items. Raising the product closer to seal-bar height can improve consistency and shorten cycle time.
Close the lid and choose your settings. Most chamber machines let you control vacuum time, seal time, and sometimes soft air or cooling time. If you are sealing dry products like jerky, steaks, roasts, or coffee, you can usually run a longer vacuum time. If you are sealing soft foods or items with liquid, you may want a slightly shorter vacuum or a gentler return of air so the product is not crushed or pushed around.
Run the cycle and inspect the bag when it finishes. A good seal should look even, straight, and fully fused across the width of the bag. The pouch should fit tight around the product, though not every item needs to be packed brick-hard. Delicate foods may do better with a little less pull.
Choosing the right settings
There is no single setting that covers every job. That is where a little practice pays off.
For fresh meat, most folks want a strong vacuum and a solid seal. Beef, pork, venison, poultry, and fish all freeze well this way. If there are sharp bones, pad the tip with a bit of freezer paper or use a heavier pouch so the bag does not get punctured.
For liquids, chamber sealers shine, but you still need to use common sense. Cool soups, sauces, gravies, and marinades before sealing. Hot liquid creates more vapor in the chamber, and that can interfere with a clean vacuum or strain the pump over time. Fill the pouch only to a level the machine can handle without letting the contents rise into the seal area.
For soft foods like berries, smoked sausage, or baked goods, too much vacuum can mash the product. In those cases, reduce vacuum time or use any gentle-air feature your machine offers. A good package is not just tight - it also protects what is inside.
Common mistakes that cause bad seals
If a chamber sealer gives trouble, the problem is often in the bag placement or product prep, not the machine itself.
A dirty seal area is the first thing to check. Moisture, grease, meat particles, or marinade on the inside top of the pouch can keep the seal from bonding. Wipe the bag opening clean before sealing.
Bag wrinkles are another frequent issue. The mouth of the pouch must lie flat on the seal bar. Even a small fold can create a channel for air leakage.
Overfilling the pouch also causes trouble. Folks naturally want to save bag space, but if the contents are too close to the top, the seal is more likely to fail. Leave enough room to work.
Then there is seal time. If the seal looks weak or peels apart, increase seal time slightly. If the bag looks scorched or warped, reduce it. Thickness of the pouch makes a difference here, so a setting that works on one bag may not be ideal for another.
How to use chamber sealer bags for meat and game
If you process your own meat, chamber sealing is one of the handiest ways to keep the freezer in order. Package steaks in meal-size portions, seal ground meat in flat packs, and divide sausage by weight so you know what you have at a glance.
Wild game benefits especially well. Venison, wild hog, duck, and fish can all suffer in the freezer when air is trapped in ordinary wrapping. A chamber-sealed pouch helps cut down on freezer burn and keeps product cleaner during long storage. Label every package with the cut and date before or right after sealing. That little habit saves time later.
For sausage makers, sealed packs also help during marinating, curing, or storing finished links. Just remember that not every cured or fermented product should be vacuum packed the same way. If you are working with specialty sausage or long-term storage methods, the right process depends on the recipe and food safety requirements.
Cleaning and upkeep matter
A hardworking machine needs basic care. Wipe down the chamber after use, especially if you have been sealing raw meat, fish, or liquids. Keep the lid gasket area clean, and check the seal bar and sealing strip for wear. If your unit uses oil, follow the service schedule and watch for cloudy oil, which can point to moisture buildup.
Good upkeep is not fancy - it is just the right tools for the job treated with respect. A dependable chamber sealer should give years of service if you keep it clean and use proper bags and settings.
When a chamber sealer is worth it
A chamber sealer is not the cheapest option on the shelf, but for many country households and small shops, it is the better long-term tool. If you pack game every season, freeze bulk beef or pork, prep meals ahead, seal liquid foods, or run a small kitchen operation, the machine quickly proves its value.
It may be more machine than a casual user needs if you only seal a few dry items now and then. But if you are after stronger vacuum performance, lower bag cost, and better handling of wet products, a chamber unit is hard to beat. That is why experienced processors and practical home users tend to stick with them once they make the switch.
At Heinsohn's Country Store, we have always believed good food work starts with dependable equipment and old time country values. Learn your machine, use the right bags, and do not rush the setup - because a clean, solid seal today means better meat, better storage, and less waste down the road.
Best Vacuum Sealer for Food Preservation
A freezer full of hard-earned venison, farm-raised beef, garden vegetables, or bulk-packed groceries deserves better than frostbite and wasted flavor. Finding the best vacuum sealer for food preservation is less about chasing fancy features and more about choosing a machine that fits the way you actually put food by - whether that means a few chickens a year, weekly meal prep, or steady work in a butcher shop.
A good vacuum sealer does two plain, valuable jobs. It pulls air away from the food, and it closes the bag tight so moisture, freezer burn, and off flavors stay out. But not every machine is built for the same kind of work. Some are right for the home kitchen. Others are better suited for hunters, homesteads, ranch households, and small food businesses that need dependable equipment day after day.
What makes the best vacuum sealer for food preservation?
The best choice is the one that matches your volume, your product, and your expectations for service life. If you mostly seal dry foods in moderate batches, a good external sealer may handle the job well. If you process a lot of meat, deal with marinades, soups, or wet cuts, or need cleaner, stronger results, a chamber vacuum sealer usually earns its keep.
That is the first trade-off to understand. External, or edge-style, machines are often smaller and less expensive up front. They work by clamping the open end of a textured bag outside the machine and drawing air out from that end. They are common in home kitchens for a reason - they are simple and can do good work when used within their limits.
Chamber sealers cost more and take up more counter space, but they are built for heavier use and broader capability. Instead of pulling air only from the bag opening, they place the whole bag inside a chamber and remove air from the chamber itself. That makes them far better for moist foods, liquids, soft products, and large runs of packaging. Heinsohn's Country Store Chamber Vacuum Sealers can vacuum & seal 2, 4 or even 6 bags per cycle which saves time AND electricity!
Chamber sealer or edge sealer?
For many country households, this is the real decision.
When an edge sealer makes sense
If you are packaging burger, sausage, steaks, cheese, dry goods, or leftovers in moderate amounts, an edge sealer can be a sensible tool. It suits the customer who seals enough food to care about preservation, but not so much that speed and heavy-duty construction become the top concern.
The catch is that edge sealers can struggle with moisture. Wet meat juices can get pulled toward the seal line and interfere with a clean closure. Some users work around that by partially freezing meat first, keeping the bag opening clean, or using absorbent strips. That can work, but it adds steps.
When a chamber sealer is worth it
If you process game, butcher livestock, package fish, preserve garden produce, or run a small food operation, a chamber unit often proves to be the better long-term investment. It seals wet products more reliably, uses smoother chamber pouches that are often more economical, and usually holds up better under repeated use.
It also gives you more flexibility. Brines, marinades, stews, soups, and fresh cuts with natural juices are easier to package. For anyone who puts up a lot of food season after season, that matters. The right tools for the job save time, save product, and save aggravation.
The features that matter most
Too many buying guides spend time on extras and not enough on the fundamentals. Here is where a dependable buyer should keep his eye.
Seal quality
A vacuum sealer is only as good as the seal it leaves behind. A strong, even seal bar matters more than a digital display or a row of buttons. If the seal fails, the package fails. Look for machines known for consistent sealing, especially on meat and moist foods.
Double seal capability can be especially useful if you are storing valuable cuts for the long haul. It adds insurance against leaks and freezer burn.
Pump strength and cycle time
A stronger pump generally means better air removal and faster work. That becomes more important when you are sealing many bags in a row. A machine that needs long cool-down breaks may be fine for occasional use, but it can slow you to a crawl during deer season, beef processing, or a large freezer restock. None of Heinsohn's Country Store Vacuum sealers require a cool-down break.
Bag availability and cost
Do not overlook this. Some buyers focus on machine price and forget they will be buying bags for years. Edge sealers usually require textured bags, which tend to cost more. Chamber sealers use smooth chamber pouches, which are often more affordable when you package in quantity.
Over time, that difference can narrow the gap in purchase price, especially for high-volume users. For commercial operations, smooth bags convey a more professional appearance.
Build quality
Plastic housings and light-duty latches may be acceptable for occasional pantry use. They are less comforting when you are sealing 80 pounds of meat in one sitting. Heavy-duty construction, dependable components, and serviceable parts matter if you expect real work from your equipment.
That is where old-fashioned buying sense still holds true. A cheaper machine that fails early is not cheaper in the long run.
Size and footprint
Counter space is real, whether you work in a farmhouse kitchen, garage processing area, or small commercial prep room. Chamber machines are heavier and larger, so be honest about where the sealer will live and how often it will be moved. A machine that is too cumbersome to set up may get used less than you planned.
Best vacuum sealer for food preservation by use case
The right answer depends on what you preserve and how often you do it.
For the home cook buying meat in bulk
A solid edge sealer may be enough if you portion family packs, preserve leftovers, and freeze meals for the month. In this case, ease of use and a compact footprint may matter more than commercial speed. Just be realistic if you also plan to seal juicy cuts or fish.
For hunters and anglers
This is where stronger performance starts to matter fast. Wild game and fish are too valuable to trust to weak seals or bags that leak in the freezer. If you process a few animals or fill coolers a handful of times a year, a capable edge sealer may work if you prep carefully. If your freezers stay busy and you package wet fillets, trimmed quarters, sausage, and ground meat every season, a chamber sealer is usually the better fit.
For homesteads and farm families
A mixed-use setup calls for versatility. One week it may be sweet corn and green beans, the next it may be bacon, chicken, or stew meat. A chamber sealer handles that variety better, particularly when moisture is part of the picture. Families preserving food year-round often appreciate the durability and lower bag costs that come with stepping up.
For butcher shops, delis, and small processors
At that point, this is not a convenience appliance. It is production equipment. Speed, consistency, and reliability are the priority. A chamber machine is the practical choice for most operations because it is built for repeated cycles and broader packaging demands. Cleaner presentation is another benefit when food is going out to paying customers.
Common mistakes when buying a vacuum sealer
One mistake is buying by price alone. Another is overbuying a large machine with features you will never use. There is a middle road, and it starts with being honest about volume.
If you seal five bags a month, a heavy commercial machine may be more than you need. If you put up hundreds of pounds of meat a year, a bargain countertop unit may leave you frustrated right when the work is piling up.
Another mistake is ignoring maintenance and parts. Gaskets, seal bars, lids, and wear items matter. Specialty equipment should come from people who understand how it is used in the real world. That has always been part of the value in a store like Heinsohns Country Store - practical equipment for people who expect it to work, not just look good on a shelf.
How to choose with confidence
Start with three questions. What foods are you sealing most often? How many bags will you run in a typical session? Do you need to package wet products without fuss?
If your answer is dry foods, moderate use, and limited space, a quality edge sealer may serve you well. If your answer is meat, fish, liquids, frequent use, or business-level output, the smarter money usually goes toward a chamber vacuum sealer.
That does not mean every customer needs the biggest unit on the market. It means buying enough machine for the work ahead. In country living, that principle applies to grinders, stuffers, smokers, and sealers alike. Equipment should earn its place.
Food preservation is not just about saving leftovers. It is about protecting the results of your labor - the deer you dressed yourself, the beef you had processed, the fish you cleaned at the sink, the produce you grew row by row, or the inventory your shop depends on. When you choose a vacuum sealer that matches the work, you waste less, store better, and put good food on the table the way it ought to be done.
How to Vacuum Seal Food for Storage Right
Freezer burn shows up fast when meat is packed poorly. A hard-earned deer roast, a mess of fish fillets, or a batch of sausage can lose flavor, color, and texture long before you ever put it on the table. That is why vacuum sealing food for freezing has become a standard practice for hunters, home butchers, homesteaders, and small food operations that want to protect what they worked for.
A good seal does more than make a package look neat. It pulls out air that causes oxidation, slows down moisture loss, and helps food hold its quality longer in cold storage. But the truth is, the machine alone does not do all the work. Better freezing results come from using the right bags, preparing food correctly, and understanding where vacuum sealing helps most and where you need to adjust your method.
Why vacuum sealing food for freezing works
Air is the enemy in a freezer. When food is exposed to oxygen, fats turn stale, colors darken, and dry spots develop on the surface. That is freezer burn. The food may still be safe to eat, but it will not eat well.
Vacuum sealing reduces that exposure in a way standard zipper bags and loose plastic wrap cannot match. On meats, that means better color retention and less dried-out surface area. On vegetables, it helps preserve texture after blanching and freezing. On prepared meals, it can keep portions organized and easier to stack.
It also makes practical sense for country households and working kitchens. A vacuum-sealed package takes up less room, labels clearly, and lets you portion food for the size of your family or business. If you process game once a season or grind meat every week, that orderliness matters.
Best foods for vacuum sealing before freezing
Meat is where vacuum sealing earns its keep. Beef, pork, venison, wild hog, poultry, rabbit, and fish all benefit from tighter packaging and less air exposure. Ground meat stores especially well when flattened into even packages, since those freeze faster and thaw more predictably.
Sausage also does well, whether it is fresh links, bulk breakfast sausage, or smoked product headed for longer storage. If you make your own sausage, vacuum sealing after the product is fully chilled helps the package stay clean and tight.
Vegetables can freeze well in vacuum bags too, but many do best after blanching. Green beans, corn, peas, broccoli, and similar produce keep better color and texture when treated first. Raw freezing without blanching works for some items, but not all. It depends on the vegetable and how long you plan to store it.
Prepared foods are another good fit. Soups, stews, chili, cooked beans, pulled pork, and casseroles can all be portioned for later use. The trick is handling moisture properly so the machine seals the bag instead of sucking liquid into the seal area.
Choosing the right sealer for the job
Not every sealer works the same way. External suction sealers are common for home use and do a good job for many dry foods and general freezer packing. They are practical for families who freeze modest amounts of meat, leftovers, and garden produce.
For heavier use, chamber sealers offer real advantages. They handle liquids better, make strong consistent seals, and stand up well to repeated work. If you process game in volume, run a small butcher operation, or pack a lot of fish, sausage, or prepared foods, a chamber unit often makes the work smoother and faster.
Bag quality matters too. Thin, bargain bags are a poor place to save money. Sharp bone edges, rough stacking, and long freezer time will expose weak material in a hurry. Good bags and dependable seals are part of the same system. The right tools for the job usually cost less than losing a freezer full of food.
How to prep food before sealing
Good results start before the lid ever closes. Food should be as cold as possible before sealing. Warm meat gives off moisture, softens fat, and can interfere with a clean seal. Chill fresh cuts thoroughly, and if you are working with ground meat or sausage, keep it cold from start to finish.
Pat wet surfaces dry when you can. A little surface moisture is not always a problem, but too much liquid around the top of the bag can weaken the seal. With fish and very juicy cuts, some folks partially freeze the product first for 30 to 60 minutes so it firms up before packaging.
Portioning matters more than people think. Freeze food in the amounts you will actually use. Two pounds of burger may make sense for one family and be a nuisance for another. Large solid blocks also freeze slower, which can affect quality. Smaller, flatter packages usually perform better.
Bones are another thing to watch. Rib ends, chop bones, and sharp game cuts can puncture bags over time. Wrapping those sharp spots in freezer paper or using a bone guard material before sealing can save trouble later.
Vacuum sealing food for freezing meat and game
Wild game deserves extra care because it is lean and often processed in batches. Venison, elk, duck, and other game meats can dry out faster in poor packaging than well-marbled domestic cuts. Trim cleanly, cool the meat fully, and package by meal size or by cut.
Steaks and chops should be arranged in a single layer when possible. Roasts need enough bag space to seal without crowding. Ground venison packs well in flat bricks that stack neatly and thaw fast. If you are freezing sausage, make sure it is chilled and dry on the outside before sealing.
Label every package clearly with the cut, weight or count, and date. A frozen package can look obvious in October and mysterious in March. Folks who put up a lot of meat know that clear labels save time and waste.
Common mistakes that shorten freezer life
The biggest mistake is sealing food with moisture or debris in the seal area. Even a strong machine cannot make a dependable seal across grease, blood, or broth. Keep the top inside edge of the bag clean, and if needed, fold the top down while filling so the sealing surface stays clear.
Another mistake is overfilling bags. Leave enough headspace for a proper seal and for the product to settle flat. Crowded bags wrinkle near the seal, and wrinkles can leak.
People also assume vacuum-sealed means permanent. It does not. Frozen food still has a shelf life, and quality still declines over time. Vacuum sealing extends that useful window, but it does not turn a freezer into a time capsule.
Finally, do not ignore freezer performance. A poor seal is one problem. A freezer that cycles too warm, gets opened constantly, or stores food loosely piled in warm spots can do damage too. Packaging and storage work together.
How long food lasts when properly vacuum sealed
Exact storage times depend on the food, the fat content, the steadiness of the freezer temperature, and how carefully the product was packed in the first place. Lean wild game often keeps quality well when tightly sealed and frozen hard. Fatty fish and rich ground products may have a shorter best-use window because fats can still change flavor over time.
That is the trade-off worth remembering. Vacuum sealing greatly improves freezer storage, but high-fat foods still need rotation. Sausage, bacon, oily fish, and seasoned ground blends should be used sooner than very lean cuts if you want top quality.
For most households, the sensible rule is simple: pack clean, freeze fast, label well, and use the oldest packages first. That habit will do nearly as much for food quality as the machine itself.
A practical setup for better results
If you freeze food regularly, set up a work flow that keeps things cold and organized. Trim and portion first, line up labeled bags, seal in batches, and move finished packages straight into a cold freezer. Do not let filled bags sit on the counter while you work through a whole deer or a hundred pounds of burger.
A sturdy sealer, quality bags, and a clean work surface go a long way. For folks who put up serious quantities of meat or prep food for business use, stepping up to heavier-duty equipment can pay for itself in saved product and fewer failed seals. That is one reason customers who shop places like Heinsohns Country Store often look for dependable equipment instead of the cheapest thing on the shelf.
Vacuum sealing is not fancy. It is simply one of the best ways to protect good food from careless storage. When you have put time, money, and labor into filling a freezer, that kind of practical protection is worth doing right.
The best freezer package is the one you can trust six months from now when supper depends on it.
Best Vacuum Sealer for Food Preservation
A freezer full of venison, bulk ground beef from a weekend processing run, garden vegetables that came in all at once - food like that deserves better than thin bags and guesswork. If you want to know how to vacuum seal food for storage, the real job is not just pulling air out of a bag. It is choosing the right method, keeping food safe, and packing it so it stays in good shape until you are ready to use it.
Vacuum sealing does two valuable things at once. It helps protect food from freezer burn and waste, and it lets you organize portions in a way that makes everyday cooking easier. For hunters, homesteaders, families buying in bulk, and small food operations, that matters. Good sealing saves money, saves labor, and helps you make the most of what you have already worked hard to put up.
How to vacuum seal food for storage without mistakes
The biggest mistake people make is thinking every food should be sealed the same way. It depends on whether you are packing fresh meat, cooked leftovers, soft fruit, dry goods, or something with a lot of liquid. The machine matters too. An external suction sealer handles many household jobs well, while a chamber sealer gives you more control with moist foods, marinades, soups, and heavier use.
Before sealing anything, start with clean, cold food. That is especially true for meat, fish, and prepared meals. Warm food creates steam and moisture, and moisture interferes with a dependable seal. If you are packaging fresh deer trim, sausage, chicken, or fish fillets, chill it first so it is firm and easier to portion. Dry the surface with a paper towel if needed. A cleaner bag opening means a stronger seal.
Portioning is where practical storage begins. Seal food in the amount you are likely to use at one time. A family pack of ten pork chops may be a bargain, but if you only thaw four at a time, package them that way. The same goes for burger, stew meat, fish, and vegetables. Smaller, planned portions help you avoid thawing more than you need.
The right setup makes the job easier
A good vacuum sealer is only part of the equation. The bag or pouch matters just as much. Use bags made for vacuum sealing, and match the thickness and size to the food. Heavy cuts with sharp bones or edges can puncture a light bag, so they may need a thicker material or a little extra protection around the bone. Paper towel, butcher paper, or a bone guard can help in problem spots.
Leave enough headspace at the top of the bag for a proper seal. If the bag is overfilled, the machine may pull moisture or food particles into the sealing area. That often leads to a weak seam that fails later in the freezer. A little extra room at the top is cheaper than losing good food.
Label every package before or after sealing, but do not skip it. Write down what it is, the cut or product type, and the date. After a few months in the freezer, a package of chili meat and a package of stew meat can look mighty similar. Clear labels save time and prevent waste.Our Chamber Vacuum Machines conveniently have a seal embossing tool that leaves custom identifying embossded letters or numbers in the seal of the package you have just sealed.
Sealing fresh meat and wild game
Fresh meat is one of the best uses for vacuum sealing, but it rewards careful handling. Trim off excessive moisture first. If the meat is especially wet, set it on a rack or tray in the refrigerator for a short time before bagging. This helps the surface firm up and reduces the chance of liquid getting drawn into the seal.
For steaks, chops, roasts, and game cuts, arrange the meat flat in the bag so it freezes evenly and stacks neatly. That makes a big difference when freezer space is tight. Ground meat can be packed in loose chubs, but many folks prefer flattening it into even slabs. Flat packages thaw faster and store better.
If you are sealing bone-in cuts, pay attention to sharp edges. A punctured bag may not show up right away, but after some shifting in the freezer, you can lose the vacuum. Wrapping the sharp end before sealing is a simple fix.
Sealing fish, poultry, and moist foods
Fish fillets and poultry need the same cold, clean handling, but they usually carry more surface moisture. Pat them dry well. If your machine struggles with liquids, partially freeze the product on a tray first. Once the outside is firm, it is much easier to vacuum seal without drawing moisture into the machine.
This same trick works for berries, soft fruit, and prepared foods. Vacuum pressure can crush delicate items or pull liquid toward the seal. A light pre-freeze helps them hold shape and gives you a cleaner result. It takes a little more time, but it is worth it if you want the food to look as good coming out as it did going in.
How to vacuum seal food for storage in the freezer and pantry
Freezer storage and pantry storage are not quite the same job. In the freezer, vacuum sealing is mostly about protecting quality. In the pantry, it is about freshness, moisture control, and organization. Dry goods like beans, rice, pasta, coffee, flour, and seasoning blends can be vacuum sealed to help them stay cleaner and more stable, though storage life still depends on temperature, light, and the condition of the product when packed.
For pantry items, make sure the food is completely dry. Even a little hidden moisture can cause trouble over time. Vacuum sealing does not replace common sense food storage. Dry food needs dry conditions, and shelf-stable products still need to be stored in a cool, appropriate place.
For the freezer, arrange sealed packages in a single layer until frozen solid. After that, you can stack them more tightly. If you pile soft packages on top of each other before they freeze, they can shift, seal unevenly, or trap air pockets.
What about liquids and prepared meals?
Soups, stews, chili, gravy, and marinated foods are often where folks get frustrated. A standard suction sealer can handle some of this work, but it takes more patience. One approach is to freeze the liquid in a container first, then transfer the frozen block to a bag and seal it. Another is to use a chamber-style machine, which is better suited to wet products.
Prepared meals are well worth sealing if you batch cook. Pack portions your household will actually use. Cool the food fully, then refrigerate it before sealing. This protects both food quality and safety. If you run a small kitchen or do regular meal prep for the family, this is where dependable equipment earns its keep.
Common problems and what causes them
If a bag loses vacuum after a day or two, the first thing to check is the seal itself. Moisture, grease, wrinkles, or trapped crumbs can keep the seam from bonding all the way across. Sometimes the fix is as simple as wiping the inside top of the bag and resealing with a little more empty space.
If the bag did seal but later puffed up around a bone or hard edge, puncture is the likely problem. Use heavier bags or protect the sharp area. If the machine does not seem to pull enough air, inspect the gasket, bag placement, and sealing strip. Even a solid machine needs clean parts and proper setup.
There is also a trade-off between pulling maximum vacuum and protecting the shape of soft foods. Bread, berries, and delicate baked goods can be crushed if you are too aggressive. In those cases, less vacuum or a partial freeze gives better results.
A few habits that pay off over time
Good vacuum sealing is less about speed than consistency. Keep food cold, bag openings clean, portions sensible, and labels clear. Use the right bag for the product, and do not try to force one method onto every kind of food.
If you process a lot of meat, preserve garden produce, or put up fish through the year, better equipment makes the job steadier and faster. That is one reason serious home users and small shops often move beyond entry-level tools. At Heinsohns Country Store, we know folks need equipment that works like it ought to, season after season, because food preservation is not a novelty around here. It is part of taking care of your household.
When you vacuum seal food the right way, you are not just storing it. You are protecting the time, money, and hard work behind every package. That is a job worth doing carefully.
How to Sharpen Butcher Saw the Right Way
How to Sharpen Butcher Saws the Right Way
A butcher saw that starts hanging up in bone or wandering through a cut is not just aggravating - it slows the whole job down. If you are figuring out how to sharpen butcher saw teeth and get that blade working right again, the main thing to understand is this: sharpening helps, but only when the blade is still worth saving.If not,Here are some new blades
A lot of folks assume any dull saw can be filed back into shape. Sometimes that is true. Sometimes it is not. On butcher saws, the tooth pattern, tooth set, blade thickness, and overall wear all matter. If the blade is bent, badly rusted, missing teeth, or worn down too far, replacing it is usually the smarter move. But if the teeth are intact and the blade is just dull from honest work, a careful sharpening can put it back into service.
How to sharpen butcher saw blades without ruining them
The first job is deciding what kind of blade you have. Some butcher saw blades are designed to be replaced rather than resharpened over and over. Others can take light touch-up work with the right file. If you force a sharpening on a hardened or heavily worn blade, you can make the cut worse instead of better.
Look closely at the teeth. You want a blade with a consistent tooth shape, no major chips, and no heavy bends along the edge. A little discoloration or surface staining is one thing. Deep rust around the gullets is another, because that weakens the blade and changes how the teeth track through meat and bone.
Before you file anything, clean the blade well. Fat, dried tissue, and residue hide the true edge. Warm soapy water works for basic cleanup, followed by a full dry-down. If there is light rust, a fine abrasive pad can help. Do not get aggressive. You are cleaning the blade, not grinding metal off it.
The tools you need
For most butcher saw touch-up work, you do not need a complicated bench setup. You do need control. A saw vise or another secure clamping method matters more than fancy equipment. The blade has to stay still while you work.
Most folks use a small triangular saw file that matches the size of the tooth gullets. If the file is too large, it changes the tooth shape. If it is too small, it can cut unevenly and leave a weak point. Good light helps, and so does a marker for keeping your place along the blade. Gloves are optional for some jobs, but eye protection is not.
If the teeth need to be reset, that is a separate operation from sharpening. A saw set tool bends teeth slightly outward in alternating directions so the blade clears the kerf. If you do not know how to set teeth evenly, go slow. Poor set causes binding, crooked cuts, and rough sawing even if the edge itself is sharp.
Step-by-step: how to sharpen butcher saw teeth
Clamp the blade firmly with the teeth exposed enough to work but not so much that the blade chatters. Chatter is one of the quickest ways to file an uneven edge. Start at one end and mark the first tooth so you know when you have gone all the way through.
Hold the file at the same angle as the existing tooth face. That part matters. On a butcher saw, you are usually trying to restore the original geometry, not invent a new one. Use light, steady strokes. Let the file cut on the push stroke, and do not saw back and forth with it.
Give each tooth the same number of strokes whenever possible. That keeps the teeth uniform. One or two light passes may be enough for a blade that only needs touching up. A neglected blade might take more, but if you find yourself bearing down hard and chasing metal for too long, that is a sign the blade may be past practical sharpening.
Work every other tooth first if the set alternates clearly, then reverse the blade or your position and do the remaining teeth from the opposite angle. This helps maintain a consistent pattern. Keep checking your progress in good light. The goal is a clean, crisp edge, not a heavily reworked tooth line.
What about raker teeth and special patterns?
Some butcher saw blades have more complicated tooth patterns than a simple hand wood saw. If your blade includes raker teeth or grouped cutting teeth, sharpening gets more exact. The cutting teeth score and the rakers help clear material. If one part of that system is off, the blade may cut rough or stall.
That is where experience counts. If you are not sure what pattern you are looking at, do not guess with a file. A blade that is inexpensive to replace is often not worth experimenting on. For a higher-quality saw used often in a shop, careful maintenance is worth the trouble, but only if you can hold the original pattern.
Sharpening versus setting the teeth
A lot of cutting trouble blamed on dullness is really a tooth set problem. A butcher saw can feel slow because the teeth have lost their outward set over time. When that happens, the blade drags in the cut. Filing the edge alone will not fix it.
Check whether the teeth still alternate evenly left and right. The set should be slight, not extreme. Too much set makes a wide, ragged cut. Too little set makes the blade bind. If only a few teeth are out of line, the saw can pull to one side.
This is one of those jobs where a little correction goes a long way. If the set is mostly intact, leave it alone and just sharpen lightly. If the set is obviously uneven, use a proper saw set tool rather than pliers. Pliers can work in a pinch, but they are hard to control and easy to overdo.
Signs your butcher saw blade should be replaced
Not every blade deserves more time. If the teeth are broken, if the blade is kinked, or if corrosion has eaten into the tooth line, replacement is often the safest and cheapest answer. The same goes for blades that have been sharpened so many times the teeth are too low to work well.
A fresh blade usually outperforms a worn blade that has been filed past its useful life. That matters in real work. Whether you are breaking down game, processing livestock, or running through repeated cuts in a small shop, fighting a tired blade costs time and effort. It can also lead to sloppy cuts and more strain on your hands and shoulders.
At Heinsohn's Country Store, that kind of practical decision is what matters most - use the right tool for the job, and know when a part has earned replacement.
Common mistakes when learning how to sharpen butcher saw
The biggest mistake is filing too aggressively. Folks see dull teeth and assume more pressure is better. It is not. Heavy filing changes the shape of the tooth fast, and once that metal is gone, it is gone.
Another common problem is inconsistent angles. If one section of the blade has different tooth geometry than the rest, the saw will feel rough and may drift. Skipping teeth, losing your place, or giving one tooth three strokes and the next one one stroke also creates trouble.
Power tools can be another trap. A grinder or rotary tool may seem quicker, but heat builds fast. That can damage the temper of the steel, especially on small teeth. Hand filing is slower, but it gives you control, and control is what keeps a butcher saw useful.
Keeping the blade sharp longer
Good maintenance saves more sharpening than any file ever will. Clean the saw after each use. Dry it completely. Store it where the blade will not bang into other tools. A light food-safe protective coating for storage can help prevent rust if the saw is not used often.
Use the saw the way it was intended. Twisting through a cut, forcing the stroke, or using a butcher saw on material it was not meant to handle will wear teeth faster. Let the saw do the work. A straight stroke and steady pressure are easier on both the blade and the user.
If you process meat regularly, inspect the blade before it gets truly dull. A light touch-up is easier than a full correction. That is true for most edged tools and cutting equipment around the farm, shop, or processing table.
Is it worth sharpening a butcher saw yourself?
For many folks, yes - if the blade is decent quality, the teeth are still sound, and you are comfortable working carefully. A light sharpening and a minor reset can extend service life and keep you working without interruption.
But there is no shame in replacing a blade when the job calls for it. Time matters. Consistent cuts matter. Safety matters. A butcher saw is a working tool, not a museum piece.
If you approach it with a steady hand and a practical eye, sharpening can keep a good blade earning its keep. And if the blade is too far gone, a clean replacement is often the country-common-sense answer.
Electric Grinder vs Manual: Which Fits?
A grinder usually gets judged on one Saturday afternoon - when there's a cooler of venison on the table, pork trim ready for sausage, and no time for a machine that can't keep up. That is where the real electric grinder vs manual question shows itself. It is not about which style looks better on a shelf. It is about how much meat you process, how often you do it, and how hard you want to work for each pound.
For some folks, a hand-crank grinder is still the right tool for the job. For others, an electric grinder pays for itself in saved time, steadier output, and less strain. Both have a place in a country kitchen, hunting camp, or small processing setup. The key is matching the grinder to the work.
Electric grinder vs manual for real-world use
The biggest difference is simple - labor. A manual grinder puts the work on your arm and shoulder, while an electric grinder puts it on the motor. That sounds obvious, but it matters more than most buyers expect once they start grinding more than a few pounds at a time.
If you are putting up two or three pounds of burger now and then, a manual grinder can still make good sense. It is straightforward, dependable, and not tied to an outlet. You can clamp it to a sturdy table, feed chilled meat, and keep moving at your own pace. There is something honest about that kind of work, especially for small batches.
But once batch sizes grow, the difference gets wide in a hurry. Ten, twenty, or forty pounds of meat changes the whole conversation. An electric grinder can turn a long evening job into something manageable. That matters to deer hunters processing a season's worth of trim, families making sausage in volume, and small shops that cannot afford to waste half a day on one step of the process.
When a manual grinder still makes good sense
A good manual grinder is not just a cheaper version of an electric unit. It serves a different kind of user. If you grind occasionally, value simplicity, and want fewer moving parts to worry about, a hand-crank model can be a solid choice.
Manual grinders also have a few practical advantages that still matter. They are easy to store, easy to carry, and useful in places where power is limited or inconvenient. A camp kitchen, hunting lease, cabin, or backup setup can benefit from a grinder that works anywhere you can bolt it down. There is also less that can fail over time. No motor, no switch, no wiring - just metal parts, a knife, a plate, and some elbow grease.
For people who like complete control over feed speed, manual grinding has its appeal too. You can slow down instantly if the meat starts to smear or if you are mixing fat ratios carefully. That can be especially helpful for hobby sausage makers learning texture and grind consistency.
The trade-off is effort. Manual grinding is slower, and it becomes tiring faster than many first-time buyers expect. It also works best when the meat is cut small, kept very cold, and fed steadily. If one person is turning the crank and another is feeding, the process goes smoother. Alone, it can feel like a chore before the batch is done.
Best fit for manual models
A manual grinder generally fits folks who grind small batches, want a backup tool, process meat only a few times a year, or prefer simple equipment with old-fashioned reliability. It can also make sense for households that are careful with space and budget.
Where an electric grinder earns its keep
An electric grinder is built for volume, repeat use, and speed. If you process game every season, make sausage in quantity, or prepare burger regularly for the freezer, the value becomes clear pretty fast.
With an electric model, the feed is more continuous and the output is more efficient. You spend less energy cranking and more attention watching the meat, texture, and fat mix. That means better workflow when you are grinding, seasoning, mixing, and stuffing in one session. For many families and small operations, that smoother pace is worth the higher upfront cost.
Electric grinders also handle tougher workloads better when properly sized. That does not mean every electric unit is heavy-duty. A light-duty kitchen model is one thing, and a larger meat grinder built for regular processing is another. Motor strength, grinder head size, plate options, and construction all affect performance. If you buy electric, it pays to buy enough grinder for the kind of batches you actually run.
There is another benefit people often overlook - consistency. When the motor does the turning, the grind stays more even. That helps if you care about repeatable results in burger, chili meat, breakfast sausage, bratwurst, or snack stick prep. In a small food business, consistency is not a luxury. It is part of the product.
Best fit for electric models
Electric grinders are usually the better choice for hunters with full freezers, homesteads that process livestock, families making larger sausage batches, and small businesses that need dependable throughput without wearing out the operator.
Cost, maintenance, and long-term value
Price matters, but sticker price is only part of the story. A manual grinder usually costs less to buy, and that makes it attractive for occasional use. If the grinder comes out twice a year and handles five pounds at a time, a hand-crank unit may be all the investment you need.
An electric grinder costs more upfront, but the value shows up in saved time and reduced fatigue. If you process often, the hours add up. So does the wear on your hands and shoulders. For many buyers, paying more once for the right machine beats fighting a too-small grinder season after season.
Maintenance is fairly straightforward with either type. Knives and plates still need to stay sharp. Parts need to be cleaned and dried properly. Meat needs to stay cold for the best grind. The difference is that electric grinders add another layer - motors, switches, and power components. That does not make them troublesome by nature, but it does mean quality matters. Cheap equipment can turn into expensive frustration.
This is where dependable construction and replacement part support matter. A grinder is not a gadget. It is a working tool. If you are buying for serious use, look for sturdy materials, practical design, and parts you can replace down the road.
Choosing the right grinder for your batch size
Batch size is often the best way to settle the electric grinder vs manual choice.
If you regularly grind under five pounds, manual can still be reasonable. Between five and fifteen pounds, it depends on your patience, physical effort, and how often you grind. Once you move into larger runs, electric starts making stronger sense. At twenty pounds and up, most people are far happier with a properly sized electric grinder.
Frequency matters just as much as volume. A man who grinds eight pounds every week may need an electric model more than someone who grinds fifteen pounds once a year. Repetition changes the value of convenience.
What to think about before you buy
Start with an honest look at how you actually work. Not how you hope to work someday, but what your real batches look like now. Think about whether you grind beef, venison, pork, or poultry. Think about sausage plans, fat content, and whether you process alone or with help. Think about storage space and whether the grinder needs to move from kitchen to camp to shop.
Then think about your tolerance for hand labor. Some folks do not mind a crank at all. Others are done with that after one heavy batch. There is no pride in choosing a harder tool than the job requires.
If you expect your processing setup to grow, buying a little more grinder than you need today can be a wise move. A dependable supplier with practical options, like Heinsohn's Country Store, makes that decision easier because the right tools for the job are easier to match when the selection covers both household and heavier-duty use.
So which one is better?
Neither type wins every time. A manual grinder is better when simplicity, portability, and small-batch control matter most. An electric grinder is better when speed, output, and repeated use matter more. The wrong choice is usually not about quality. It is about mismatching the machine to the workload.
Good meat deserves a grinder that can handle it without waste, strain, or disappointment. If your work is occasional and modest, a manual model can serve faithfully for years. If your table, freezer, or business depends on steady production, electric is often the smarter investment. Buy for the job you truly have, and the grinder will earn its place every season.
Sausage Casings Guide for Better Links
A good sausage can be ruined by the wrong casing. You can have well-seasoned meat, the right fat ratio, and a dependable stuffer, but if the casing does not fit the job, the final product will not cook, smoke, peel, or bite the way it should. That is why a solid sausage casings guide matters for anyone making links at home, processing game, or turning out batches for customers.
Casings are not all the same, and the differences are not small. Some are built for a tender snap on a fresh bratwurst. Others are made to hold a large summer sausage through a long smoke. Some can be eaten, some should be peeled, and some are easier for beginners while others reward a steady hand and a little experience. Choosing right from the start saves meat, time, and frustration.
What this sausage casings guide covers
The first thing to understand is that casing choice starts with the sausage itself. Fresh sausage, smoked sausage, snack sticks, hot dogs, bologna, and summer sausage all ask different things from the casing around them. Diameter matters. Strength matters. Whether the casing is edible matters. Even how long you plan to hang, smoke, dry, or store the sausage plays a part.
Most sausage casings fall into three working categories for the average processor - natural, collagen, and fibrous. There are also specialty options like cellulose, but for most home shops, hunting camps, and small processing rooms, those three categories cover the lion's share of real-world use.
Natural casings: traditional and hard to beat
Natural casings are the old standard, and for many sausage makers they still make the best eating sausage. These casings are typically made from cleaned intestines, most often hog, sheep, or beef. They are edible, they take smoke well, and they give that familiar bite and snap people expect from many traditional sausages.
Hog casings are probably the most common choice for fresh sausage links, bratwurst, and many smoked sausages. They usually offer a medium diameter that suits a wide range of recipes. If you want a link that looks and eats like a classic country sausage, hog casings are often the place to start.
Sheep casings are smaller and more delicate. They are often used for breakfast links and slimmer sausages where a fine texture and smaller bite are wanted. They can produce a very nice finished product, but they are less forgiving during stuffing. If your meat is not mixed well or your stuffing pressure is uneven, sheep casings are more likely to split.
Beef casings are larger and used for bigger sausages. They work well for ring bologna, large smoked sausage, and certain specialty products. They have a more substantial size and can handle sausages that need more room.
The trade-off with natural casings is handling. They need rinsing, soaking, and a little patience. They can vary somewhat from one length to another because they are a natural product. For many folks, that is part of the craft. For others, especially beginners or anyone trying to keep production moving, convenience may matter more.
Collagen casings: practical and consistent
Collagen casings are a good fit when you want more uniformity and easier handling. These casings are made from processed collagen and are available in edible and non-edible forms. They are popular because they are consistent in size, simpler to prepare, and easier to load onto stuffing tubes than natural casings.
Edible collagen casings are common for snack sticks, fresh breakfast sausage, and smaller smoked links. They save time and can be especially helpful if you are making repeated batches and want predictable results. If you are producing a lot of links for family use, hunting season, or local sales, consistency can be worth plenty.
Non-edible collagen casings are often used for larger products where the casing is removed before eating. These can work well for salami-style products or certain smoked sausages, depending on the recipe and process.
The main thing to know is that collagen does not always deliver the same old-fashioned bite as natural casing. It can be excellent for the right product, but if your goal is a true butcher-shop snap on a brat or traditional smoked link, natural casing may still come out ahead. Still, collagen is a dependable working choice and often the easiest option for people learning the ropes.
Fibrous casings: built for larger sausage
Fibrous casings are made for strength. They are generally non-edible and are commonly used for summer sausage, large bologna, salami, and other products that need a firm shape through stuffing, smoking, and hanging. If you are making chubs instead of links, fibrous casings are often the right tool for the job.
These casings hold up well under pressure and do a good job of maintaining a uniform shape. Many also take smoke nicely, which helps with appearance and flavor. Some come with printed patterns or colors, but the real value is function. They are sturdy, practical, and well suited to larger-diameter sausage.
Because they are not meant to be eaten, peeling matters. A good fibrous casing should come off clean after the sausage is finished and chilled. If you are making summer sausage for gift boxes, deer camp, or retail sale, a neat peel and solid shape make a difference.
Matching casing to the sausage
This is where a sausage casings guide becomes useful in the shop, not just on paper. The right casing depends on what you are making.
For fresh bratwurst, Italian sausage, or country links, hog casings are a strong choice because they give a traditional look and bite. For small breakfast links, sheep or small collagen casings make more sense. For snack sticks, edible collagen is often preferred because it keeps production moving and gives a uniform size. For summer sausage and bologna, fibrous or larger non-edible casings are usually the better route.
If you are smoking sausage, make sure the casing you choose can handle the process. Some casings hold up better to long smokehouse time than others. If you are making fresh sausage for the freezer, tenderness and ease of cooking may matter more than smoke performance. If you are selling product, consistent diameter and appearance may carry more weight than old-style feel.
Sizing matters more than people think
Casing size affects cooking time, portion size, and final texture. A narrow casing gives you a quicker-cooking sausage with more surface area. A larger casing creates a heavier bite and often suits smoking or slicing better.
It also needs to match your equipment. Your stuffing tube should fit the casing properly. Too large, and you may split the casing trying to load it. Too small, and stuffing can become slow and awkward. A dependable sausage stuffer with the correct horn size makes casing work much easier than trying to force the job with the wrong setup.
This is where practical equipment matters. The casing, tube, meat mixture, and stuffing pressure all work together. If one part is off, the whole batch can become a chore.
A few handling tips that save trouble
Natural casings should be rinsed and soaked according to their packing method. Salt-packed natural casings need more attention than ready-to-use options. Keep them moist while stuffing, and do not overfill them. A casing should be full, but still have enough give to twist into links without bursting.
Collagen casings generally need less preparation, but they should still be handled with care. Dry collagen can split if pushed too hard. Fibrous casings often need soaking before use so they become flexible enough to stuff properly.
Temperature matters too. Very warm meat can smear fat and create uneven stuffing. Very cold meat that has not been mixed well can lead to poor bind and air pockets. A steady, even fill is better than rushing. Good sausage making is still hands-on work, and there is no shortcut around that.
Which casing is best for beginners?
If you are just starting, edible collagen casings are often the easiest to work with. They are consistent, simple to load, and less fussy than natural casings. That said, if your main goal is traditional bratwurst or smoked links, it is worth learning hog casings early. Once you get used to rinsing, soaking, and stuffing them, they are not nearly as intimidating as they seem.
For larger smoked products, fibrous casings are usually straightforward as long as you prep them correctly and tie or clip them securely. They are practical, especially for hunters processing venison or folks making seasonal batches of summer sausage.
A family business like Heinsohn's Country Store knows that most customers do not need fancy talk. They need dependable supplies that fit their recipe, their equipment, and the way they actually work. That is the real point of choosing casings well.
The best casing is not the one with the most claims on the package. It is the one that suits the sausage in your hands, the smokehouse or kitchen you are using, and the kind of finished product you want to put on the table. Start there, and the rest of the job gets a whole lot easier.
Chamber Sealer vs Suction Sealer
If you package deer meat in the fall, freeze garden produce through the summer, or run a small shop that seals product every day, the question of chamber sealer vs suction sealer is not just about features. It is about buying the right tool for the job. One machine is built for lighter household work and convenience. The other is built for volume, wet foods, and steady use that does not quit when the work piles up.
A lot of folks start with a suction sealer because it is familiar, smaller, and cheaper up front. That can be the right choice. But many people who process meat regularly, seal soups or marinades, or package product for sale eventually find themselves looking at a chamber machine and wishing they had gone heavier-duty from the start.
Chamber sealer vs suction sealer: the core difference
The main difference comes down to how air is removed from the bag. A suction sealer pulls air out from the open end of a specially textured bag while the bag stays outside the machine. Then it heat-seals the top. This setup works well for many dry foods, leftovers, and freezer storage, but it has limits when liquid gets near the seal area.
A suction sealerchamber sealer works differently. The whole bag goes inside the chamber. The machine removes air from the entire chamber and the bag at the same time, then seals the bag before air returns. Because pressure changes happen inside the chamber, liquids stay where they belong instead of getting sucked toward the sealing bar. That one difference changes a lot in day-to-day use.
If you are sealing fresh sausage, marinated cuts, fish fillets, soups, stews, or prepped meals, a chamber sealer is often the better fit. If you are mostly sealing dry items in smaller batches, a suction sealer may handle the job just fine.
Where a suction sealer makes sense
A good suction sealer still has a place in plenty of kitchens and hunting camps. It is usually lighter, takes up less counter space, and costs less at the start. For a family that seals a few packs of steaks, some burger, coffee, cheese, or pantry goods from time to time, that lower cost matters.
It is also simple to pull out, use, and put away. If your sealing jobs come once in a while instead of every weekend, there is no shame in choosing the simpler machine. Not every home setup needs commercial-style equipment.
Another reason people stay with suction machines is bag cost in certain setups. While bag prices vary by size and supplier, many people already know the roll-and-cut style bags used with external machines and are comfortable working that way. For occasional use, the overall cost can stay reasonable.
The trade-off is performance under real processing conditions. If there is moisture at the top of the bag, the seal can fail. If you are sealing many bags in a row, some lighter machines need a break to cool down. If the cut of meat has a bone edge or the bag does not lay right, you may get weak seals or trapped air pockets. For light work, those are manageable issues. For steady production, they get old fast.
Where a chamber sealer earns its keep
A chamber sealer is made for folks who process food in quantity and need dependable results. Hunters packaging large amounts of venison, homesteaders freezing bulk vegetables, ranch families putting away beef, and small businesses packing product for sale all benefit from the heavier build and more consistent sealing.
The biggest advantage is handling liquids and wet foods. Marinades, brines, fresh meat juices, soups, sauces, and stews are all far easier to package in a chamber machine. Instead of fighting liquid creeping toward the seal line, you can seal with confidence and move on to the next bag.
Another strong point is bag economy. Chamber bags are often less expensive than the textured bags many suction sealers require. Over time, that matters. If you seal a lot of product every month, lower bag cost can help offset the higher purchase price of the machine itself.
Chamber units also tend to provide a cleaner, more uniform package. That matters in the freezer because less trapped air means better protection against freezer burn. It matters on the sales side too. A neatly sealed package looks more professional in a farm store, butcher case, or market cooler.
Chamber sealer vs suction sealer for meat processing
For meat processing, the answer often comes down to how much you do and what kind of product you handle. If you butcher a deer or two each year and mainly package trimmed, dry cuts, a suction sealer may be enough. It can protect steaks, roasts, and ground meat well when used carefully.
If you process multiple animals, make sausage, seal fresh cuts right off the table, or package meat with seasoning or marinade, a chamber sealer starts to make a lot more sense. It saves time, reduces wasted bags, and gives you a stronger chance of getting a good seal the first time.
Bone-in cuts are worth mentioning too. No vacuum bag likes a sharp edge. You still need to protect the bag with wrap or padding where needed. But with a chamber machine, the overall sealing process is more controlled, which helps when you are working through a full day of packaging and cannot afford constant do-overs.
For wild game, fish, and bulk sausage work, reliability matters more than bells and whistles. A machine that seals the same way on bag number 3 and bag number 30 is worth paying attention to.
Size, cost, and everyday practicality
This is where many buyers hesitate, and fairly so. Chamber sealers are usually heavier, larger, and more expensive than suction machines. They take up counter space and are not the kind of appliance most people want to lift in and out of a cabinet after supper.
That means your available space matters. If you have a dedicated prep area, game room, shop kitchen, or back room for processing, a chamber machine fits more naturally. If you are working in a small kitchen and only seal food now and then, a compact suction unit may better match your setup.
Up-front cost matters too. A suction sealer is easier on the budget. A chamber sealer is more of an investment. But a fair comparison should include how often you seal, how many bags you use, and how much product you stand to lose from poor seals or freezer burn. Cheap is not always economical if it leaves you repackaging meat on a busy night.
For small food businesses, time is part of the cost as well. If a chamber machine helps staff move faster and package product more cleanly, that pays back in ways that do not show up only on the equipment invoice.
Which sealer is right for your work
The best choice depends on your workload, not just your wish list. If you seal occasionally, mostly work with dry foods, need something compact, and want a lower entry price, a suction sealer is a sensible tool. It covers a lot of household needs without taking over the kitchen.
If you seal often, work with meat and liquids, package in larger batches, or want a machine that feels more at home in a serious prep setup, a chamber sealer is usually the better long-term buy. It is especially well suited for hunters, homesteaders, fishermen, and small processors who depend on their equipment and do not have time for fussy results.
There is also a middle ground. Some folks start with a suction sealer, learn what their workload really looks like, and upgrade later. That is not wasted effort. It is part of figuring out what kind of operation you actually run. Others know from day one that they are packaging hundreds of pounds of meat, sealing liquid-rich foods, or selling product to customers. In that case, buying heavier-duty equipment first can save money and aggravation.
At Heinsohn's Country Store, we have long believed in old time country values and the right tools for the job. Vacuum sealing is no different. Buy for the work you do most, not the work you imagine doing once a year.
When you are standing at the table with meat to pack, fish to freeze, or meals to put away for later, dependable equipment matters more than fancy claims. Choose the machine that fits your hands, your space, and your workload, and it will serve your family well for years.